Displaying items by tag: and
Basic Tips and Technique Videos
Welcome to our Basic Tips and Techniques video section. These videos feature various Kiss Looms. The techniques are not specific to the loom shown and can be done on any loom. If there is another technique you would like to see please let us know at This email address is being protected from spambots. You need JavaScript enabled to view it..
While all of our looms work in the same way we are dividing the videos up into the style of loom used so that you can easily find and see the information you are looking for. Please be sure to check out the other loom videos on the loom specific video pages.
Click on the heading below to go to that section of videos or written materials.
Basics Videos
Casting On and Knitting Row 1 for First Time Kissers
Drawstring Cast On
Purling
Comparing fabrics made on the F0 and F1 Kiss Looms
Frogging – Ripping out stitches
Tips: The Fabric Doesn't Flow Down/Caught Pins
Working with a Kiss Loom - Some Basics
Double Knitting Setup
Double Knit Kit Setup Instructions
Cables
Wanderlust Cables
Crossing 1x1 Cables
Fixing a Cable Mistake without ripping the whole thing out
3 Stitch Cables
Twisted Rope Cables
Increases
Yarn Over Increase
Knitting in the Front and Back of the Stitch Increase
Make One Increase
Lifted Increase
Decreases
Full Fashioned Decrease
Simple Decrease
Ribbing
Tuck Ribbing
Mock Ribbing
Socks
Anniversary Socks
Loom Knitters Sockumentaries – knitting socks with cotton elastic yarn
Loom Knitters Sockumentaries – working the toe on a toe up sock
Getting a True Pair of Socks using Self Patterning Yarn
Other Stitches & Techniques
Double Knitting Stockinette Stitch
Double Knitting Figure 8 Stitch
Irish Mesh
Heart Lace
Long Tail Cast On Cables & Lace Cardigan
Making Lace Eyelets
Fairisle
Mitten Thumb
Placing Hand Knitted Ribbing on a Kiss Loom
Segmented Crown
3, 6 and 9 Peg I-cords
Casting On and Knitting Row 1 for First Time Kissers
Drawstring Cast On
Purling
Comparing fabrics made on the F0 and F1 Kiss Looms -
Frogging – Ripping out stitches - Sometimes mistakes happen and you need to remove some rows from your project. You can "tink" back or unknit a few rows to correct your mistakes.
The Fabric Doesn't Flow Down - Yarn sometimes gets caught on pins and if you know why you can avoid it. This videos shows you some common reasons this happens.
Working with a Kiss Loom - Some Basics
Double Knitting Setup on the Small Gauge Looom
Double Knit Kit Setup Instructions
Crossing 1x1 Cables
Fixing a Cable Mistake without ripping the whole thing out
3 Stitch Cables
Twisted Rope Cables
Knitting in the Front and Back of the Stitch Increase
Make One Increase
Lifted Increase
Full Fashioned Decrease
Simple Decrease
Mock Ribbing
Anniversary Socks
Loom Knitters Sockumentaries – knitting socks with cotton elastic yarn
Loom Knitters Sockumentaries – working the toe on a toe up sock
Getting a True Pair of Socks using Self Patterning Yarn
Double Knit Stockinette Stitch - See the setup video above in basics for how to set up your loom. The stockinette stitch will give you a knit fabric on both the front and back in double knitting.
Double Knit Figure 8 Stitch - See the setup video above in basics for how to set up your loom. This stitch resembles ribbing when knit and is a stretchy fabric.
Irish Mesh
Heart Lace
Long Tail Cast On Cables & Lace Cardigan
Making Lace Eyelets
Fairisle
Mitten Thumb
Placing Hand Knitted Ribbing on a Kiss Loom
Segmented Crown
3, 6 and 9 Peg I-cords
Basic Setup Instructions
Kiss Loom Manual
How to use the Kiss Loom
How to Assemble Kiss Modular looms and Double Knit Setup Instructions
Getting to Know your Modular Loom Settings
Cast On's and Stitches
How to Cast on and E-wrap your Loom
Non-Loopy/Double E-wrap Cast On
Purl Stitch Instructions
Techniques
How to do Bobbles on Kiss
Cables on the Kiss
SSK and K2tog
yo, ssk and k2tog alternate method when slant doesn't matter
Bar Increase/KFB Increase
Skipped Peg Short Rows
Sock Loom Instructions
Sock Loom Worksheet with Negative Ease
Bind Off's
Simple Bind Off on the Kiss Loom
Small Gauge Videos
Welcome to our Small Gauge 2 Way Adjustable Kiss Loom video section. These videos will work for our small gauge peg modular looms as well as our small gauge 2 way adjustable looms.
While all of our looms work in the same way we are dividing the videos up into the style of loom used so that you can easily find and see the information you are looking for. Please be sure to check out the other loom videos on the loom specific video pages.
Crochet Cast On
Crochet Cast On Using Latch Needle
Long Tail Cast On
Drawstring Cast On Plus Top Down Hat Lesson
Knit Stitch/U-Wrap - forms the traditional v-shaped knit stitch. Tighter stitch then the e-wrap, a little looser then the traditional knit stitch (aka - reverse purl). Allows for the continuous knit stitch when used on the Kiss Looms - in other words - you can knit the entire row before knitting off.
Purl Stitch with Regular Loom Pick - forms the traditional horizontal purl bump on the front side of your knitting.
Purl Stitch with Purling Hook - forms the traditional horizontal purl bump on the front side of your knitting. Uses the white handled tool with the crochet hook like tip.
Double Knit Stockinette Stitch - See the setup video below in techniques for how to set up your loom. The stockinette stitch will give you a knit fabric on both the front and back in double knitting.
Double Knit Figure 8 Stitch - See the setup video below in techniques for how to set up your loom. This stitch resembles ribbing when knit and is a stretchy fabric.
Double Knitting Setup
Braided Cable
K2tog and SSK
Stockinette or Hung Hem
Crochet Bind Off
Crochet Bind Off Using a Latch Tool
Transfer Bind Off
Drawstring Gathered Bind Off
What Loom is Best for Me?

Here at Kiss Looms we know that deciding what loom to get is a big decision and you want to make sure you are looking at the right looms. To help make this easier we've put together a questionnaire of sorts to help you decide. You are welcome to also email us at any time with any questions - This email address is being protected from spambots. You need JavaScript enabled to view it.
Our product list can be viewed on the left hand menu bar by type of loom.
Another question we often get is "What is the biggest panel I can make with this loom" - to see how we figure that out click here.
The following are great ways to help you figure out what loom you'd like to purchase. Click on the options under the heading to see what options will work.
By yarn weight, I like working with:
Lace weight yarn
Sock yarn #1 or #2
Sport weight #3 up to super bulky yarn
By type of project, I like to make:
Socks
Small projects like scarves and hats
Medium projects like lapghans and baby blankets, kids clothing
Large projects like afghans and adult sweaters
Queen or king sized blankets
I'm not sure – all kinds of projects!
On the go projects - looms that travel easy
By technique, I like to do:
Double knitting
Weaving
Increase/decrease in the round
By ability, I have trouble:
With vision
With hands
With arthritis
For lace weight yarn we recommend using either the F0, which is our extra fine gauge loom with no pins, just pegs, or the F1 fine gauge loom. The F0 gets an average of 7-8 stitches per inch. The F1 gets an average of 6 stitches per inch. Those averages are based on sock weight yarn.
The F0 and F1 come in a few sizes - short and what we like to call the "classic" 11" loom. The classic has more than enough pegs to do adult sized socks, even Christmas stocking sized socks! Both also have the option of adding short or long end pairs. If you are wanting to do a shawl or sweater panel you may want to get the classic and add long end pairs to have enough pegs. The F1 also has long sides available. These are great when wanting to knit large sweaters, shawls or blankets. The long sides need to have at least the small end pair to connect them for knitting in the round.
For more information and to see our F0 and F1 looms click here!
There are several options for you here. Our F0 extra fine gauge loom will give a nice tight stitch using sock weight yarns, on average 7-8 stitches per inch. The F1 fine gauge loom will be a little looser but still no "holey" socks (average 6 stitches per inch). The F2 loom is best with thicker sock yarn or even sport weight yarn for thicker socks (average 5.5 stitches per inch with sock yarn and 5 stitches per inch with worsted).
These fall under our fixed gauge looms. What this means is that you can adjust the number of pegs you use in the round to make any size tube or sock size by moving the sliders back and forth across the sides to change the number of pegs to knit. This loom is not gauge adjustable like our other looms.
The F0, F1 and F2 come in a few sizes - short and what we like to call the "classic" 11" loom. The classic has more than enough pegs to do adult sized socks, even Christmas stocking sized socks! These also have the option of adding short or long end pairs. If you are wanting to do a shawl or sweater panel you may want to get the classic and add long end pairs to have enough pegs. The F1 and F2 also have long sides available. These are great when wanting to knit large sweaters, shawls or blankets. The long sides need to have at least the small end pair to connect them for knitting in the round.
For more information and to see our F0, F1 and F2 looms click here!
Sport weight #3 up to super bulky yarn
Fixed 2 Loom
For sport weight and worsted weight yarn you have a couple options. The F2 will work with both of these yarns. The worsted makes a very tight knit, thick fabric, sport weight is also a good tight knit. The F2 is not a gauge adjustable loom, but you can adjust by number of pegs used when knitting in the round. The F2 is also good for thicker sock weight yarn. On average the F2 has 5.5 stitches per inch with sock yarn and 5 stitches per inch with worsted weight yarn.
For more information and to see our F2 fine gauge looms click here!
Small Gauge 2 Way Adjustable
The most versatile loom we have is the small gauge 2 way adjustable loom. It is great for sport weight up to super bulky. The small gauge knits the smallest possible gauge fabric of all our adjustable looms. It adjusts by number of pegs you can knit in the round by moving the 1 peg ends or 7 and 31 end sliders back and forth across the sides to change the number of pegs to knit. The second way it adjusts is by gauge. You can add washers between the peg and pin boards making each stitch larger and allowing more room for thicker yarns. The great thing about the pins is that they have a side effect of making nice even stitches and you can wrap the whole row with a u-wrap stitch before knitting off. Click here for a video on how to adjust the gauge of your looms.
The small gauge comes in short 30 peg, classic 60 peg, and 77 peg long looms. The 77 peg sides have 77 pegs per side for a total of 154 pegs. These sides need to be used with either the 7, 16 or 31 peg ends. All of these end pairs will work with any of the small gauge looms.
For more information and to see our small gauge 2 way adjustable looms click here!
Small Gauge Modular
We also have small gauge modular looms available in 20 peg pairs. The difference in these looms is that they are not adjustable by number of pegs in the round. You can put four of them together for a total of 80 pegs to work in the round or as a flat panel or you can add brackets and make a bigger loom for larger projects. Also these looms have all the corners on the outside, whereas on the 2 way adjustable looms the corners or at least one corner is always set in when knitting on few pegs. Typically this isn't a problem once you get used to the loom.
For more information and to see our small gauge modular looms click here!
Regular Peg 2 Way Adjustable
Another option for worsted weight to super bulky is the regular peg 2 way adjustable loom. This loom is similar in function to our small gauge loom but instead has pegs with the opening facing you. This peg orientation is most similar to other commercially produced looms that have a groove in front. Really there is no difference in the peg orientation other than the regular has a slightly bigger stitch count at 4 stitches per inch to the small gauge 4.5 stitches per inch. These looms are available in 20 peg short, 40 peg classic and 53 peg side looms. The 53 peg sides need to be used with either the 5 or 21 peg ends. All of these end pairs will work with any of the regular peg looms.
For more information and to see our regular peg 2 way adjustable looms click here!
Regular Peg Modulars
We also have regular peg modular looms available in many different peg increments. They are available in two board pairs as well as sets of four boards and a hat combo of various size boards perfect for making infant through adult sized hats. The difference in these looms is that they are not adjustable by number of pegs in the round. You can put the looms together in a lot of configurations. The sets come with corner brackets but the pairs do not. Straight brackets can be used to hook the looms end to end and corner brackets are available separately. Also these looms have all the corners on the outside, whereas on the 2 way adjustable looms the corners or at least one corner is always set in when knitting on few pegs. Typically this isn't a problem once you get used to the loom.
For more information and to see our regular peg modular looms click here!
Small projects like scarves and hats
Small projects can be made on all of our looms. The short looms and classic length looms are great for small projects. You can always add bigger ends on the short looms for larger projects as well. Just remember you can knit on the looms in the round or as a flat panel using any number of pegs. If you are knitting flat panels, all of our looms can be used as single rake looms. For instance on our 2 way adjustable looms we provide you with a package of shorter nuts and bolts so that you can use each side of the loom independently from each other. These nuts and bolts are also needed for the sides when using the end pairs with the looms.
Hats
Our 2 way adjustable looms can knit any size tube in the round by moving the 1 peg ends or 5, 7, 21 and 31 end sliders back and forth across the sides to change the number of pegs to knit. If you are making hats you will need 72 pegs for an average adult hat, 54 pegs for kids hats, 48 pegs for baby hats, and 42 pegs for newborn hats.
What this means is, if you choose a loom with 72 or more pegs then you will be able to make all sizes of hats by moving the sliders up and down your boards. These numbers are based on using either the regular peg 2 way adjustable loom or the small gauge 2 way adjustable. Depending on how many washers you use it will make the hat bigger or smaller, with a looser or tighter stitch. On both looms you will need end pairs to have the needed 72 pegs. It also helps to have these if you are wanting to turn the brim of a hat as it allows more room in the middle to pull the fabric up properly to rehang it.
Hats can also be made on our fixed looms as well. It is best to make a swatch and see how the fit will be before proceeding with the actual pattern. For example 74 pegs for an adult hat on the regular 2 way adjustable will average an 18.5" diameter hat before stretching, the F1 with 74 pegs will average a 12.3" diameter hat. Since the gauge is much smaller more pegs will be required to equal the same size hat.
Our regular peg modular loom has a hat combo that includes the necessary boards to make infant through adult sized hats. With this set you can also make baby booties, a baby blanket and baby sweater! This set includes a 6 peg modular set with corner brackets, 9 peg modular pair, 15 peg modular pair and 2 pr of straight brackets along with all bolts and washers needed.
For more information and to see our regular peg modular hat combo click here!
Medium projects like lapghans and baby blankets, kids clothing
To make medium sized projects like lapghans and baby blankets or kids clothing you will need to determine what size panel you would like to make. For clothing this is easy - get a shirt and measure from one seam to the other on the front at the widest point. This will tell you the panel size. My 7 year old's youth medium shirt panel size is 17" wide. My 3 year old's toddler medium is 12". So for the kids sizes you will need 77 pegs for the youth medium and 54 for the toddler medium (3T) size based on 4.5 stitches per inch on the small gauge loom. The regular peg loom has 4 stitches per inch and will need fewer pegs to make the kids clothing - 68 and 48 pegs. Now this is based on average stitch count using worsted weight yarn. Your actual gauge might be different and you always need to swatch before beginning a project, especially clothing! To determine your panel size click here.
So for these projects you could use the small gauge 2 way adjustable with 60 pegs along with the 16 peg ends for a total of 90 pegs or the regular 2 way adjustable with 40 pegs and 21 peg ends with 80 total pegs. The modular looms of either type would also work for these projects.
If you are wanting to use sock weight yarn and one of our fixed looms you will again need to determine panel size needed. Remember to always go a bit larger as you will need to seam the sides and don't want to lose width when you do.
When counting how many pegs to use and adding end pairs make sure you subtract the number of pegs on the slider from your count. For example on the regular and small gauge there is a 1 peg slider on each end so the 60 peg loom has 58 pegs on the sides. The fixed looms have 3 peg ends.
For baby blankets there are various sizes you could do, and it all depends on what you want and how much yarn you have. There is a really good website that we found that has updated 2014 sizes for blankets. You can view the website here - http://craftingwithstyle.blogspot.com/2008/03/afghan-blanket-sizes.html. Let's look at the infant - 2 year size of 24" x 30". For this blanket you could use the small gauge 2 way adjustable loom with 60 pegs and the 31 end pair for a total of 120 pegs. If you used all pegs you would have a panel 26.6" wide. If you add washers the blanket will be larger. For larger blankets you would need the long sides and at least a small end pair or the larger modular pieces.
Large projects like afghans and adult sweaters
For larger afghans and adult sized clothing you will need the long sides on our fixed looms, regular and small gauge 2 way adjustable looms and either the short or long end pairs. The best way to determine which loom is to determine how big a panel the loom will make and if that will work for the projects you have in mind. To determine what size panels our looms will make click here.
I often get the question about making a queen or king size blanket in one panel. There's no right way to answer this question really, so here are some points to consider if this is what you are wanting to do.
If you are a new loomer (less than a year) a blanket this large is not something you want to try to accomplish in one panel. It takes a very long time and is very heavy while knitting. It can be a very daunting project and discourage you from pursuing this craft and we want you to have fun and enjoy this hobby.
Kiss modular looms are the only looms we have that can make a blanket this large. You will need several of the largest modular sets to have enough pegs. This loom set up is expensive for a first loom and very large and needs a permanent location until the project is finished. As mentioned above, this can take a long time.
The best way to make a blanket is in panels for a few reasons. One is that you feel like you are progressing in the project when you finish a panel. Panels also don't require a large loom or take as much time. Many knitters, especially newer loomers don't want to tackle seaming and that is why they wish to knit in one panel. The truth is, you will eventually need to seam something!  So it is best to study and practice till you are good at it. You won't regret it! Knitting the panels also gives you time to build up your confidence towards seaming.
If you do decide to go ahead and pursue smaller panels for your blankets I would still recommend getting our long loom sides. If you are wanting to knit on the finer gauge looms keep in mind - smaller stitches also means more time knitting. If this is your first blanket go for the small gauge 77 sides and either 7 peg ends or 31 peg ends. This is a great all-around loom for larger projects and one of my personal favorites (Kelly).
For more information and to see our small gauge 2 way adjustable looms click here!
I'm not sure – all kinds of projects!
If you are not yet sure what kind of project you'd like to make my best recommendation is to get the small gauge 2 way adjustable loom. This is the most versatile loom we have. The classic 11" with 60 peg and the 7 peg ends will give you what you need to do adult sized hats as well as many, many other projects. This will give you a nice basic starting place that you can build on later.
For more information and to see our small gauge 2 way adjustable looms click here!
If you are looking to try our looms with a smaller investment I would recommend the 6 peg modular set with 24 pegs or getting either the small gauge short 30 peg loom, or the regular short 20 peg. Any of these looms can be added to in the future to make larger looms by using larger modular pieces and straight brackets or by adding larger end pairs on the 2 way adjustable looms.
For more information and to see our regular peg modular looms click here!
For more information and to see our 2 way adjustable looms click here!
On the go projects - looms that travel easy
The most portable of our looms are the short looms. They are about 7" long and will easily fit in a purse or travel bag. Our classic length are 11" long so they are also fairly portable and easy to use in the car (as long as you aren't driving, of course  ). Are short end pairs are small at approximately 6" long.
All of our 2 way adjustable looms can be used for double knitting (where the front and back of the fabric are identical and the fabric is twice as thick). Double knitting is done by removing the pin boards entirely and only using the peg boards and either washers or the 1 peg ends as spacers. This setup will work like the commercial long looms but have a lot more stabilty as well as gauge variation.
The modular looms can also be used for double knitting. To do this you will also need our modular double knit kit. I recommend using longer modulars instead of bracketing smaller ones for this. Remove the pin boards as mentioned above and use the double knit kit with brackets to space the peg boards apart. See the How to Assemble Kiss Modular Looms tutorial page 9 for more information on setup.
Kiss Looms can also be set up for weaving. In particular, the modular looms are ideal for this. There are many who have ventured into weaving on the Kiss, but at this time we can not offer teaching and support in this area. If you are interested in helping us to explore and develop this area of our looms please contact Kelly at This email address is being protected from spambots. You need JavaScript enabled to view it..
Increase/Decrease in the Round
The 2 way adjustable looms are perfect for increasing and decreasing in the round. Our 1 peg sliders or short and long end pairs are made to slide up and down the board for just this reason! Whether you are doing a sweater in the round or decreasing down for the crown of a hat, the 2 way adjustables are the looms for you.
If you have limited or no sight and would like to try our looms we recommend the regular peg modular looms. All of the corners are outside edges that will be easy to feel your way along to knit. The regular pegs with the opening towards the front also make it easier. If you have any questions or troubles you can email us at any time at This email address is being protected from spambots. You need JavaScript enabled to view it..
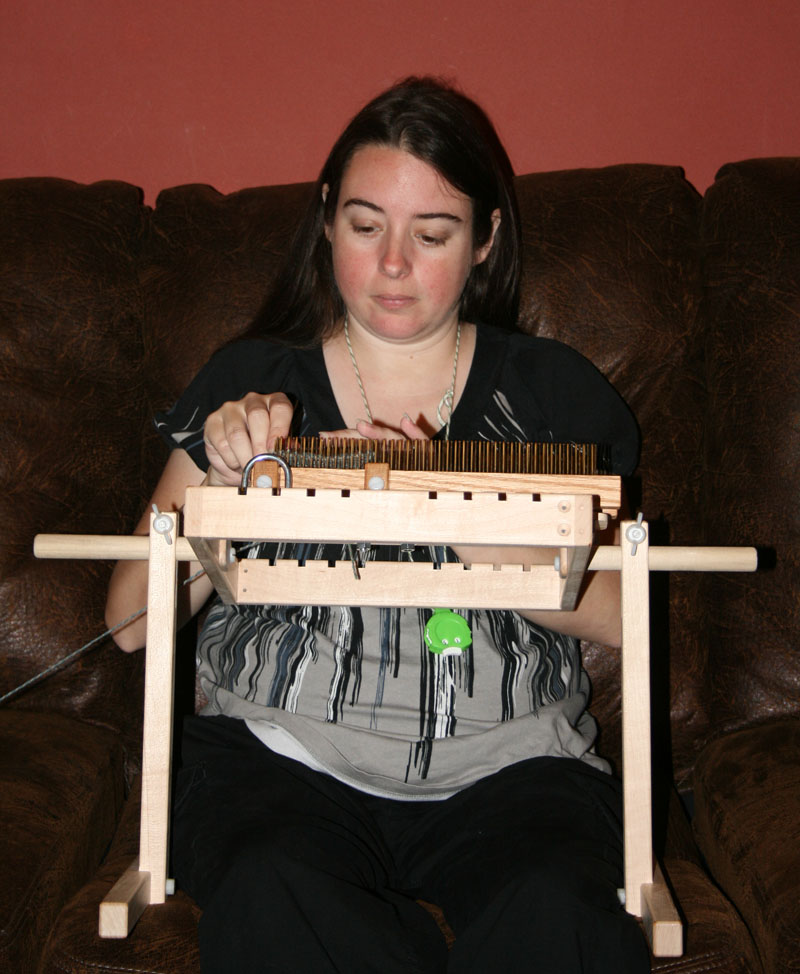
Our looms are very light - typically under 1 pound. So they are easy to handle. Another thing that can help is our loom lap stand. The stand supports the loom so that you can use one or both hands to knit. The modular looms will probably be the best option with all the corners on the outside. The stand will hold up to the 30x30 modular set (120 pegs).
We have had several loomers tell us that they were long time needle knitters until they started having problems with arthritis. Once they decided to try loom knitting they have noticed that they can knit with little to no pain. This is what one of our customers had to say about Kiss Looms:
Your design is incredible! I wasn't even able to knit on a KK loom. It was just too hard on my arthritic fingers. But with my F2, I have no pain at all no matter how long I knit. I haven't been able to knit for years and now I can again. I'm thrilled. I think it's been nearly ten years since I was able to knit so you can probably imagine how excited I am to have this in my life again. - Linda
You can figure out what the panel size will be based on our average stitches per inch. Take the number of pegs divided by the average stitch count and that will give you a good idea of the size. Of course when it comes down to knitting your project you always need to do your own swatch with your yarn to double check your actual gauge.

Regular Peg Videos
Welcome to our Regular Peg Kiss Loom video section. These videos will work for our regular peg modular looms as well as our regular 2 way adjustable looms.
While all of our looms work in the same way we are dividing the videos up into the style of loom used so that you can easily find and see the information you are looking for. Please be sure to check out the other loom videos on the loom specific video pages.
E-Wrap Cast On - a loose/loopy cast on.
Non Loopy/Double E-Wrap Cast On - a stretchy cast on perfect for most things, pairs nicely with the super stretchy bind off.
Long Tail Cast On
Drawstring Cast On
Knit Stitch/U-Wrap on the Modular Looms - forms the traditional v-shaped knit stitch. Tighter stitch then the e-wrap, a little looser then the traditional knit stitch (aka - reverse purl). Allows for the continuous knit stitch when used on the Kiss Looms - in other words - you can knit the entire row before knitting off.
Knit Stitch/U-Wrap on the Regular 2 Way Adjustable - forms the traditional v-shaped knit stitch. Tighter stitch then the e-wrap, a little looser then the traditional knit stitch (aka - reverse purl). Allows for the continuous knit stitch when used on the Kiss Looms - in other words - you can knit the entire row before knitting off.
Purl Stitch - forms the traditional horizontal purl bump on the front side of your knitting. There are 3 purling videos in this series. The first one has more instruction but #2 has some very helpful camera angles and #3 will cover the continuous purl stitch. I encourage you to watch all three so as to get really comfortable with purling.
Purl Stitch #2
Transfer Bind Off
Back Stitch Bind Off
Projects
Basic Hat Knit a Long using 2 6-peg modular looms with 2 pair of brackets
Click the titles to view the pdf tutorials in your browser or right click and select "save link as" to download them.
How to use a Kiss Loom featuring the Regular Modular Looms - this tutorial goes over the e-wrap, double e-wrap, u-stitch, and purling.
Videos
While all of our looms work in the same way we are dividing the videos and written tutorials up into the style of loom used so that you can easily find and see the information you are looking for. There are also video pages showing cast on's and bind off's on various looms, but the wrapping is identical no matter which loom you are using.
If there is a technique-specific video you'd like to see please email us at This email address is being protected from spambots. You need JavaScript enabled to view it..
Regular Peg Modular Kiss Loom - includes the 6 peg modular or any other sizes of modular looms.
Regular Peg Adjustable Kiss Loom - these are regular 2-way adjustable slim looms.
Small Gauge Compact Peg Adjustable Kiss Loom - these are the turned peg small gauge 2-way adjustable slim looms and the 20 peg small gauge modular looms.
Fixed 1 & 2 Kiss Looms - these are fixed fine gauge sock looms with pegs and pins on the same board.
Fixed 0 Kiss Looms - these are extra fine gauge looms with pegs only.
Basic Tips & Techniques - videos that include a variety of looms with various tips and techniques. Really great video selection!
Classic Kiss Videos/pdf instructions - these are older videos from the original tutorials page.
Cast On's - cast on techniques shown on various looms.
Bind Off's - bind off techniques shown on various looms.
Weaving Looms - videos for triangles and rectangles.
How do the Pins Work? -We often get questions about how our pins work and how the fabric can flow down. I hope this video helps you!
For additional videos please visit:
The Answer Lady- Our own Kathryn Doubrley presents us with lots of videos on various looms with different stitches and techniques, including a few loom a long videos.
The Vintage Storehouse - loom knitting stitchionary! Lots of videos with different stitch patterns.
Payment & Shipping Info
Order Information:
International Orders - please email me your order directly for international orders so that the correct shipping amount can be applied - This email address is being protected from spambots. You need JavaScript enabled to view it..
Shipping Rates - shipping is based on the order total. For USA orders light weight shipping is $6.00, and medium weight shipping is $11.00. Please email for all other shipping rates, including Canada.
Delivery Method & Time - All of the Kiss Looms are custom made to order to insure the best quality for each of our customers. It is also what allows us to provide such a wide variety of items to choose from. All packages are shipped via USPS Priority or First Class Mail. Order will ship within 7-14 business days. Shipment time depends on the order and my stock of made up parts at the time of the order. Please provide correct "to your door" shipping address when you order.
Payment Method - You may pay via paypal using a paypal account or a regular credit card.
Kiss Loom Lap Stand
 Introducing the new Kiss Loom Lap Stand! The perfect addition to your knitting loom collection.
The stand holds your loom so that you have both hands free to hold your yarn and pick. Just knit the side facing you then lift the loom up and turn! The square part tilts forward and backward to give you the ability to set it to your most comfortable knitting position. The stand is especially good for those with physical limitations that may need extra help holding the loom so that they can knit.
There is 13 3/4" between the legs at the smallest setting and approximately 22" at the widest setting. The stand sits 11" high (measured from the bottom of the legs to the bottom of the dowel rod). If you are interested in a wider or taller stand please email  us, we'd be happy to accomodate your needs.
We have put together a complete list of what looms will work on the stand and which ones will not so that you can know if your looms will fit. To see the list - click here. For assembly instructions - click here.
For any questions email This email address is being protected from spambots. You need JavaScript enabled to view it.
Price: $59.95 plus shipping
Loom Stand Kit includes frame, yarn guide and all mounting hardware (4 "L" brackets, screws and 4 U-bolts).
Have more than one project going at a time? You can add another set of slats and brackets to your stand for ease in changing projects.
 Slat/Bracket Add On
$14.00 plus shipping
Includes 4 "L" brackets and 2 slats.

U-Bolt Add On
$6.00 plus shipping
Includes 4 U-Bolts for use with 2-Way Adj looms, will also need additional slats for use.
E-Wrap Cast On & Stitch
How to Cast on Using the E-Wrap Method:
Written by Graciela Worth © August 20, 2007
Make a slip Knot and place it on the first peg, move the yarn to the back, and go around the first pin:

Move the yarn to the front to go around the second peg, and e-wrap the second peg.

Again go to the back pin, the second one, placing the yarn around the second pin, go to the 3rd. peg and e-wrap it. Continue like this for the amount of pegs, you want to cast on. To turn around: move the yarn to the front peg, last one that you e-wrapped, then move the yarn behind the second pin, move the yarn to the front of the second peg, and e-wrap the second peg.

Continue until all pegs have been e-wrapped.

Continue this process for your basic e-wrap stitch.
Click here to download the PDF instructions for the E-Wrap Stitch & Cast On
{youtube}eNMz_3eEiso&feature{/youtube}
FAQ's
Order Information:
International Orders - please email me directly for international orders so that the correct shipping amount can be applied - This email address is being protected from spambots. You need JavaScript enabled to view it..
Shipping Rates - shipping is based on the order total. For USA orders light weight shipping is $6.00, and medium weight shipping is $11.00. Shipping to Canada and other countries is based on weight and distance. We will provide you with a quote for US Priority Mail (6-10 days) and US First Class International Mail (approx 3-4 weeks) to let you choose which price/time frame is most appropriate for you. Depending on weight, First Class mail may not be an available option.
Delivery Method & Time - All of the Kiss Looms are custom made to order to insure the best quality for each of our customers. It is also what allows us to provide such a wide variety of items to choose from. All packages are shipped via USPS Priority or First Class Mail. Order will ship within 7-14 business days. Shipment time depends on the order and my stock of made up parts at the time of the order. Please provide correct to your door shipping address when you order.
Payment Method - You may pay via paypal using a paypal account or a regular credit card.
What makes a Kiss Loom different?
Kiss Looms are the only true gauge adjustable loom on the market. We use a peg and pin system to make it adjustable. Pegs are on one board and pins on another - you simply add washers between the boards to make the gauge larger. You can knit with no washers for the smallest gauge or add up to the 7 included washers to equal the KK gauge. The great thing about the pins is that they have a side effect of making nice even stitches and you can wrap the whole row with a u-wrap stitch before knitting off.
So why the pins?
We get this question all the time! Here is a brief overview that will help you understand.
To wrap a Kiss Loom you always wrap in front of the peg and behind the pin. The pins are what adjust the gauge. The further the pins are from the pegs (by adding washers between the boards) the more yarn is allowed for the stitch - making the gauge bigger. It's like on a KK if you could move the pegs closer or further from each other - the pin just does that in a different direction. It makes the knitting quick and easy and creates a very evenly knit fabric.
What is a U-Wrap?
A u-wrap is a knit stitch that forms the traditional v-shaped stitches of a stockinette fabric (all knit stitches). The difference is that with the pin system you can wrap the entire row then knit off. This is similar to the technique of the e-wrap on the KK's EXCEPT that you get the nice v-shaped stitch. An e-wrap is also called a twisted knit stitch because it is literally twisted. It forms a y-shaped stitch.
Loomers always have a lot of questions about our looms and how they work. We hope to answer some of your questions here.
 What makes the Kiss Looms unique is that they have an adjustable gauge. Gauge is set by changing how much yarn is used for each stitch. With regular looms this is done by changing the distance between pegs. The kiss loom starts out with a small gauge then uses gauge pins to increase the distance the yarn travels between pegs. The gauge is determined by this traveling yarn and by changing the settings on our looms you increase the amount of traveling yarn - and therefore change the knitted gauge.
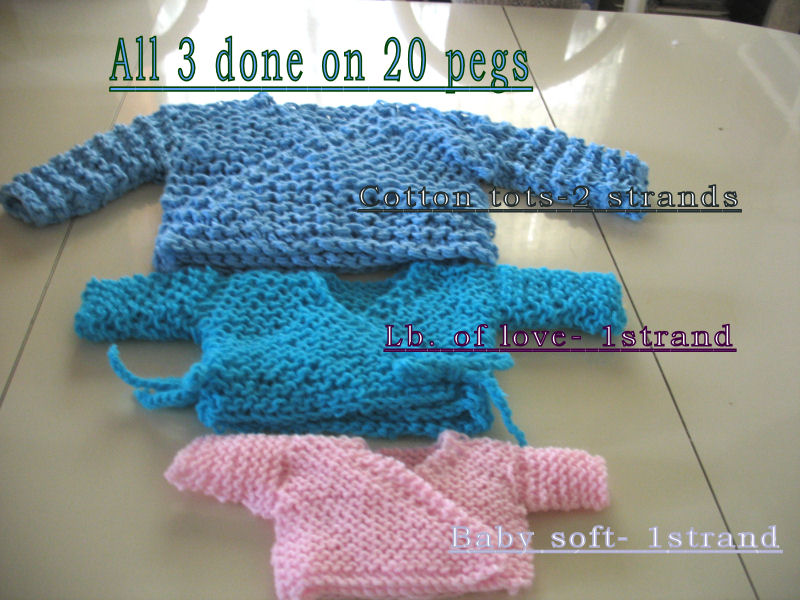
There are 3 basic settings that can be obtained just by changing the way the boards are assembled. Anything between the basic settings can be obtained using the supplied washers. This first Kiss Loom, a 20 peg board, was tested by Graciela Worth and the first project was the three sweaters above. All 3 were done on the same number of pegs using the 3 gauge settings on the loom.
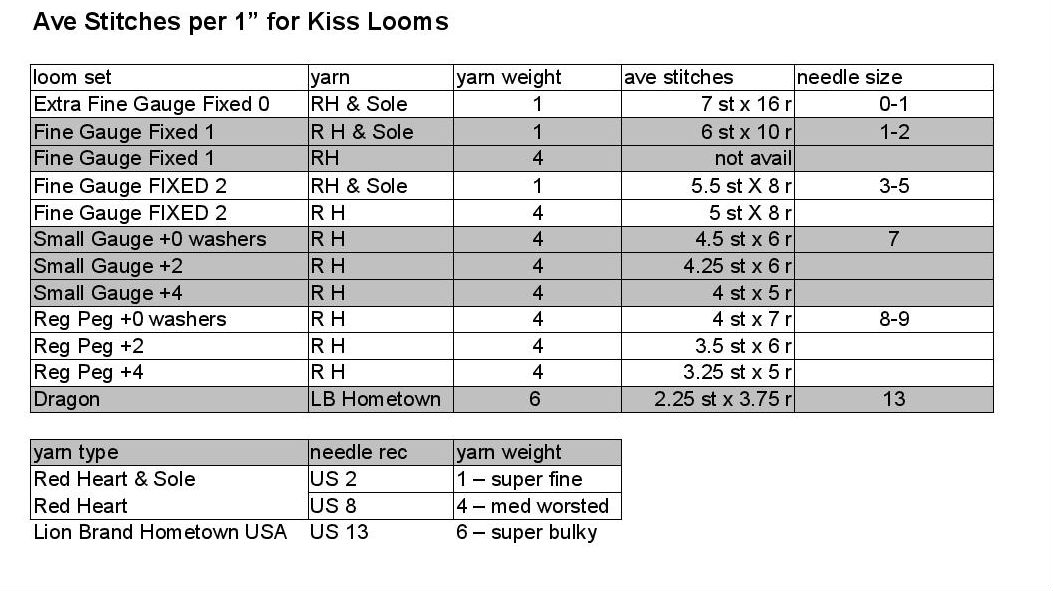
You can see from this chart the ave number of stitches per 1" that you can get by changing the peg style of the loom or simply by changing the number of washers between the boards.
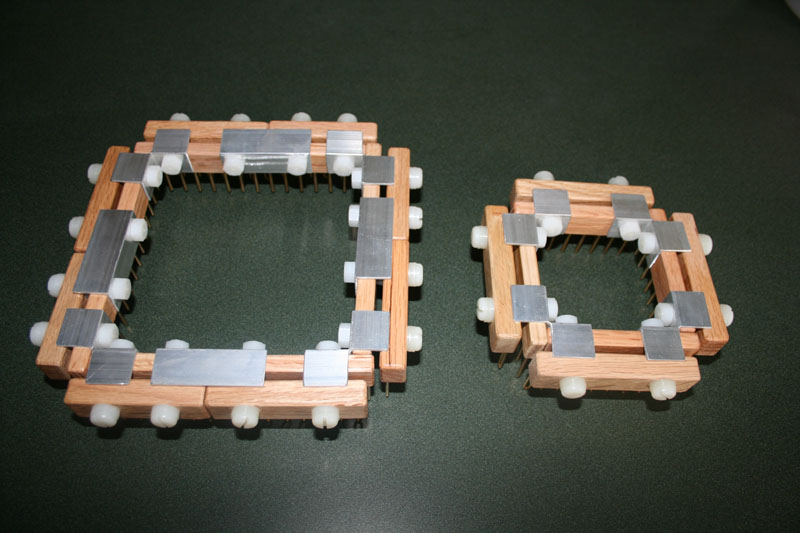
General Overview of the Modular Loom
A modular loom also has the gauge adjustable feature as most of our looms but is a fixed number of pegs for knitting in the round. The great thing about the modular looms is that you can build a larger loom using the straight and corner brackets. Simply attach the modulars together into any number of pegs you need whether you are knitting a flat panel or knitting in the round. Want to knit a king size blanket in one panel? This is the loom for you. The smallest tube you can knit is a 24 peg (based on the 6 peg modular set of 4 6-peg sides).
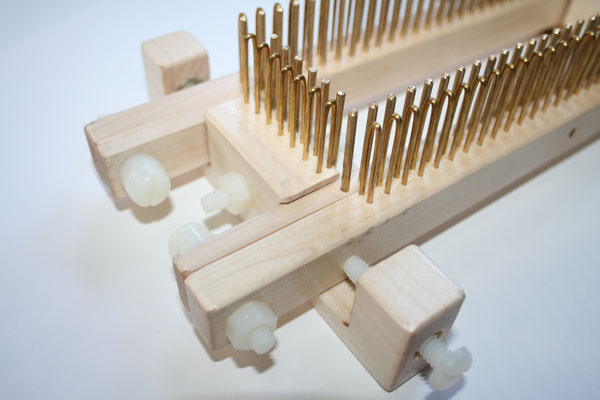
General Overview of the 2-Way Adjustable Loom
The looms are adjustable in 2 different ways. One way is the adjustable gauge by adding or subtracting washers. The other way it is adjustable is by number of pegs to knit in the round. Our end pieces, whether a single peg slider or the larger ends can be be moved back and forth across the sides to change the number of pegs to knit. With the 1 peg sliders you can move it all the way down to one end to knit a 4 peg i-cord in the round.
General Overview of the Fixed Looms
The fixed looms are the only ones that are not gauge adjustable. In order to get the small gauge needed for sock yarns the pegs and pins must be on the same board. Remember, the pin system is what makes for a nice even stitch and allows you to wrap the whole row before knitting off. There are two types of fixed looms - fixed 1 and fixed 2. The fixed 1 is the smallest gauge you can get on a Kiss Loom. The fixed 2 is a slightly larger gauge and bridges the gap between the fixed 1 and small gauge looms.
General Overview of the Straight Loom
The straight loom was the original Kiss Loom. It is made to be used as a single rake or you can add the optional board and remove the pin board to use the loom as a double rake for double knit fabric. This loom is not compatible with the modular or 2-way adjustable looms.
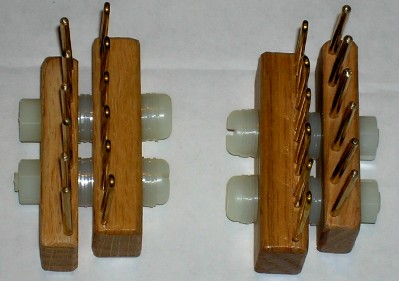
Does my loom come with hardware to adjust size and gauge? - Each of our looms comes with nylon washers (7 for each bolt) for gauge adjustment. The modular sets also come with corner brackets to attach the looms in a square for tubular knitting. Modular pairs do not come with any brackets (you will need at least 2 packages of straight bracket pairs to add the pairs to a set). The pictures below shows the two different types of metal brackets used in the modular looms, the straight L shaped brackets for the straight pieces and the "split" corner brackets to attach the corners of the loom. Check out the assembly instructions on the tutorials page for more information.
.jpg) |
 |
What is the smallest gauge I can achieve on the Kiss Loom? - Each knitter and each yarn used can affect the gauge of your knitted fabric. A swatch should always be made to check gauge before starting a project. The smallest gauge of loom is our extra fine gauge F0 loom. You can achieve roughly 8 stitches per inch using sock weight yarn with this loom. With our small gauge adjustable loom you can achieve 4.5 or 5 stitches per inch with a worsted weight yarn.
Can I use any pattern on a Kiss Loom? - Yes, knitting patterns, whether loom or needle, are not specific to the type of loom you are using. Any pattern can be done on the Kiss Loom - just make sure you knit a swatch to check that you are setting the gauge correctly to the type of yarn you are using.
Why isn't my loom fitting together right? - Make sure that you have assembled the loom in the proper order by following the assembly instructions. Do you have the same number of washers between each of the pin and peg boards? Are all the sides on the same setting (For mods - 1st setting, 2nd setting, or 3rd setting.) Check out the assembly instructions on the tutorials page for more information. If you are using end pairs your pins on the side and the end should line up at a 90 degree angle. Regular Gauge slider placement. Small Gauge slider placement.
I have lost some of my washers and/or screws. Where can I get new ones? - The washers are listed in the tools section of the website. If you need screws please email us - This email address is being protected from spambots. You need JavaScript enabled to view it.
How do you keep the yarn from coming up and slipping off the back of the pins? - That can be remedied by holding your finger on the yarn behind the pin as you knit off or placing one rubber band around the entire side of the loom you are knitting off, but only on the pins.
How do I set up my end pairs on my loom? - The end pairs have a notch to insert the sides. The end pair bolt can be tightened onto the side at any point along the length of the side. Make sure to line up the pins on the side at a 90 degree angle with the pins on the ends regardless of number of washers used.
How do I set up the 1 peg slider on my loom? - Regular Gauge slider placement. Small Gauge slider placement.
Didn't find an answer to your question? Feel free to email - This email address is being protected from spambots. You need JavaScript enabled to view it..
Testimonials
Your design is incredible! I wasn't even able to knit on a KK loom. It was just too hard on my arthritic fingers. But with my F2, I have no pain at all no matter how long I knit. I haven't been able to knit for years and now I can again. I'm thrilled. I think it's been nearly ten years since I was able to knit so you can probably imagine how excited I am to have this in my life again. - Linda
You guys rock! I received my loom and keychain today and I have been in heaven. Thank you so much! The loom is awesome. I have started a Christmas baby cocoon for the Pine Ridge baby project and it's coming out beautiful! I love the small gauge.
Thank you again and again and again. I've said it before and I will say it again, I will never use anything but Kiss ever again. The product is exceptional and the people behind it are awesome!
...everything is easier and faster using the KISS. - Kendall
Well guess who was waiting at my door when I got home from work! That's right, Lil Slim. I threw dinner in the oven, took care of my mother and starting getting to know him. I AM IN LOVE! Geesh, I wish I would have started out with KISS when I was learning. I wasted so much money on looms that I will not use anymore. I absolutely love the KISS. - Kendall
I am so in love with my new Kiss loom! I have a couple projects that are almost complete and will post pics soon. So far I have used my Small Gauge Compact Slim 2-Way Adjustable as a double knitting board and a one sided rake. The ability to do a smaller guage has been amazing and I can't wait to do more projects on this loom. Thanks for offering such a versatile product! I may be ordering a second one very soon so that I can have more than one WIP lol! -- Kim Jones
I'm Julia and a loom knitter for about 5 years. I have used looms like the KK, Markman Farms, DA, and CinWood, and it looks like I saved the best for last. I had seen the KISS loom website a few years ago but didn't think I would be able to use it. However, when I received my first KISS loom a couple months ago, to my surprise, I started a hat in the afternoon and finished it that evening with no problem. Then, I did have some of the minor problems that most beginners have, like multiple loops on a pin preventing fabric to flow. But now I think I've gotten through the learning curve and am ready for more challenging projects. --Julia
It's not my skill, it's the loom - sometimes I like to just sit and look at the fabric that comes out. It is so beautiful! The stitches are so even. The ribbing is so nice too. I've been needle knitting for almost 50 years and I can't do anything that nice. It's amazing. I just love to look at the texture, the consistency ... it's just so pretty. -- Kathi
I always get excited when I talk about the Kiss-Looms made by Cliff because they are a work of art and produce extraordinary pieces. I have been using the Kiss-Looms for a little over a year now and have several modular looms, the sock loom and now several of the 2wayadj looms. Out of the many looms I have the Kiss is my favorite. I have never been able to knit ‘properly’ with two needles so I gave up trying many years ago. When I found looms on the Internet, they worked OK but still seemed like something was missing. It still didn’t quite feel or look quite like “hand knitting”. I had some hand spun yarn that I made and wanted to knit gifts for family and friends with it. Then I found The Kiss-Looms. WOW!! Everything I wanted and more. -- Andrea Kump-Eicher, Central Florida
_____________________________________________________________________
My favorite knitting looms are Kiss adjustable knitting looms. I like these looms because they are adjustable and you don't have to buy different looms to get different gauges. They are well made and very versatile. Also Cliff and Graciela who is involved in the Kiss loom group are very happy and fast about answering any questions you have. -- Karol, Michigan
_____________________________________________________________________
I love my KISS Looms. They are the most versatile looms I have found. Since I got my KISS loom I haven’t used another loom. Compared to other brands the wrapping and knitting off are much faster and easier. Being able to work with different weight yarns on the same loom is great. The looms are easy to assemble. When you purchase a KISS you always get fast, excellent service. –- Angela
_____________________________________________________________________
I love my Kiss Looms! There is nothing like them. They are so versatile and useful, that even though I own several different brands of looms, I usually have my projects on my Kiss Looms. I mean, having a Kiss Loom is like having a whole set of interchangeable knitting needles at your fingertips. And since I can use the continuous u-stitch and the continuous purl stitch, I find myself finishing projects much faster than using a regular peg loom. The resulting fabric's stitches are much more even, as well. The design helps you maintain a consistent tension. These are a MUST for any loom knitter! -- Robin McCoy
Kiss Looms is home to the 2-Way Adjustable Gauge Loom! Our looms were designed with the Kiss principal in mind. Keep it simple! Our looms allow you to change your gauge for any project, while still using the same loom. Knit with sock weight yarn using our fixed gauge looms or get an adjustable loom to knit from sport weight to super bulky!
Any questions? Not sure what loom to get? We love helping you with suggestions.Feel free to email us at: orders@kiss-looms.com