Displaying items by tag: wrap
Cast On Videos
Welcome to our Cast On Kiss Loom video section. These videos will work for any of our looms. Videos are shown with many different looms, but the wrapping is identical no matter which loom you are using.
E-Wrap Cast On - a loose/loopy cast on.
Non Loopy/Double E-Wrap Cast On - a stretchy cast on perfect for most things, pairs nicely with the super stretchy bind off.
Long Tail Cast On
Drawstring Cast On
Drawstring Cast On Plus Top Down Hat Lesson
Crochet Cast On
Crochet Cast On Using Latch Needle
Extra Fine Gauge F0 Videos
Welcome to our Extra Fine Gauge F0 Kiss Loom video section. These videos will work for our extra fine gauge F0 looms. This particular loom is our only Kiss Loom that does not have pins! This loom knits up an extra fine gauge fabric with an average of 7-8 sitches per inch.
While all of our looms work in the same way we are dividing the videos up into the style of loom used so that you can easily find and see the information you are looking for. Please be sure to check out the other loom videos on the loom specific video pages.
Double E-wrap Cast On
Long Tail Cast On
Crochet Cast On with a latch needle
Knit Stitch
Purling
Basic Features
Cables
K1P1 Ribbing
Fixing a ribbing mistake
Frogging
Short Rowing Heels & Toes
Fixed Fine Gauge Videos
Welcome to our Fixed F1 and F2 Kiss Looms video section. These videos will work for our both our fixed fine gauge slim looms.
While all of our looms work in the same way we are dividing the videos up into the style of loom used so that you can easily find and see the information you are looking for. Please be sure to check out the other loom videos on the loom specific video pages.
Non-Loopy, Double E-wrap Cast On - a stretchy cast on perfect for most things, pairs nicely with the super stretchy bind off.
E-Wrap Cast On - a loose/loopy cast on.
Knit Stitch - forms the traditional v-shaped knit stitch. Tighter stitch then the e-wrap, a little looser then the traditional knit stitch (aka - reverse purl). Allows for the continuous knit stitch when used on the Kiss Looms - in other words - you can knit the entire row before knitting off.
Purl Stitch With Regular Loom Pick - forms the traditional horizontal purl bump on the front side of your knitting.
Purl Stitch With Purling Hook - forms the traditional horizontal purl bump on the front side of your knitting.
Increasing - Casting On at the Edge of the Knitting
Transfer Bind Off
Regular Peg Videos
Welcome to our Regular Peg Kiss Loom video section. These videos will work for our regular peg modular looms as well as our regular 2 way adjustable looms.
While all of our looms work in the same way we are dividing the videos up into the style of loom used so that you can easily find and see the information you are looking for. Please be sure to check out the other loom videos on the loom specific video pages.
E-Wrap Cast On - a loose/loopy cast on.
Non Loopy/Double E-Wrap Cast On - a stretchy cast on perfect for most things, pairs nicely with the super stretchy bind off.
Long Tail Cast On
Drawstring Cast On
Knit Stitch/U-Wrap on the Modular Looms - forms the traditional v-shaped knit stitch. Tighter stitch then the e-wrap, a little looser then the traditional knit stitch (aka - reverse purl). Allows for the continuous knit stitch when used on the Kiss Looms - in other words - you can knit the entire row before knitting off.
Knit Stitch/U-Wrap on the Regular 2 Way Adjustable - forms the traditional v-shaped knit stitch. Tighter stitch then the e-wrap, a little looser then the traditional knit stitch (aka - reverse purl). Allows for the continuous knit stitch when used on the Kiss Looms - in other words - you can knit the entire row before knitting off.
Purl Stitch - forms the traditional horizontal purl bump on the front side of your knitting. There are 3 purling videos in this series. The first one has more instruction but #2 has some very helpful camera angles and #3 will cover the continuous purl stitch. I encourage you to watch all three so as to get really comfortable with purling.
Purl Stitch #2
Transfer Bind Off
Back Stitch Bind Off
Projects
Basic Hat Knit a Long using 2 6-peg modular looms with 2 pair of brackets
Click the titles to view the pdf tutorials in your browser or right click and select "save link as" to download them.
How to use a Kiss Loom featuring the Regular Modular Looms - this tutorial goes over the e-wrap, double e-wrap, u-stitch, and purling.
E-Wrap Cast On & Stitch
How to Cast on Using the E-Wrap Method:
Written by Graciela Worth © August 20, 2007
Make a slip Knot and place it on the first peg, move the yarn to the back, and go around the first pin:

Move the yarn to the front to go around the second peg, and e-wrap the second peg.

Again go to the back pin, the second one, placing the yarn around the second pin, go to the 3rd. peg and e-wrap it. Continue like this for the amount of pegs, you want to cast on. To turn around: move the yarn to the front peg, last one that you e-wrapped, then move the yarn behind the second pin, move the yarn to the front of the second peg, and e-wrap the second peg.

Continue until all pegs have been e-wrapped.

Continue this process for your basic e-wrap stitch.
Click here to download the PDF instructions for the E-Wrap Stitch & Cast On
{youtube}eNMz_3eEiso&feature{/youtube}
FAQ's
Order Information:
International Orders - please email me directly for international orders so that the correct shipping amount can be applied - This email address is being protected from spambots. You need JavaScript enabled to view it..
Shipping Rates - shipping is based on the order total. For USA orders light weight shipping is $6.00, and medium weight shipping is $11.00. Shipping to Canada and other countries is based on weight and distance. We will provide you with a quote for US Priority Mail (6-10 days) and US First Class International Mail (approx 3-4 weeks) to let you choose which price/time frame is most appropriate for you. Depending on weight, First Class mail may not be an available option.
Delivery Method & Time - All of the Kiss Looms are custom made to order to insure the best quality for each of our customers. It is also what allows us to provide such a wide variety of items to choose from. All packages are shipped via USPS Priority or First Class Mail. Order will ship within 7-14 business days. Shipment time depends on the order and my stock of made up parts at the time of the order. Please provide correct to your door shipping address when you order.
Payment Method - You may pay via paypal using a paypal account or a regular credit card.
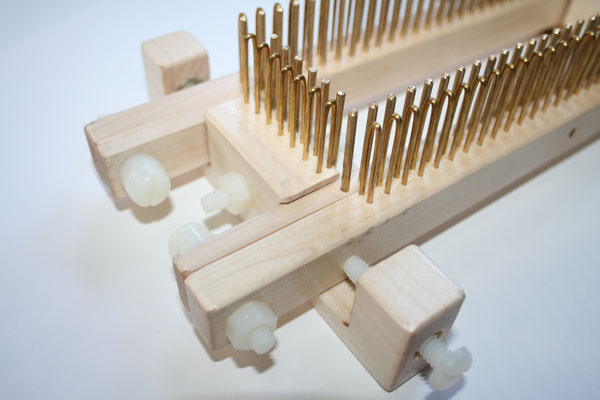
What makes a Kiss Loom different?
Kiss Looms are the only true gauge adjustable loom on the market. We use a peg and pin system to make it adjustable. Pegs are on one board and pins on another - you simply add washers between the boards to make the gauge larger. You can knit with no washers for the smallest gauge or add up to the 7 included washers to equal the KK gauge. The great thing about the pins is that they have a side effect of making nice even stitches and you can wrap the whole row with a u-wrap stitch before knitting off.
So why the pins?
We get this question all the time! Here is a brief overview that will help you understand.
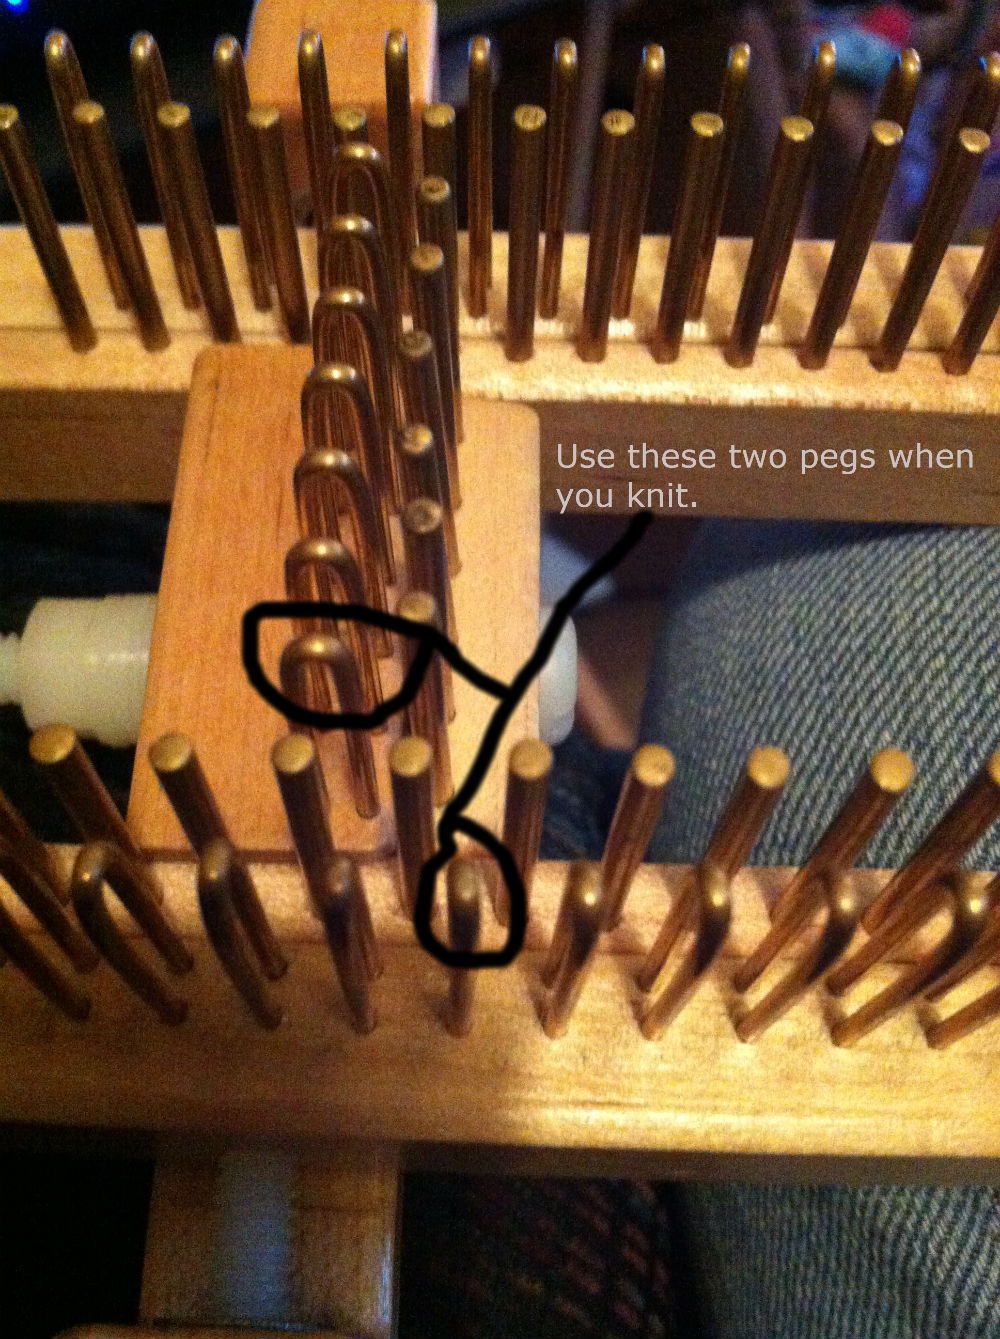
To wrap a Kiss Loom you always wrap in front of the peg and behind the pin. The pins are what adjust the gauge. The further the pins are from the pegs (by adding washers between the boards) the more yarn is allowed for the stitch - making the gauge bigger. It's like on a KK if you could move the pegs closer or further from each other - the pin just does that in a different direction. It makes the knitting quick and easy and creates a very evenly knit fabric.
What is a U-Wrap?
A u-wrap is a knit stitch that forms the traditional v-shaped stitches of a stockinette fabric (all knit stitches). The difference is that with the pin system you can wrap the entire row then knit off. This is similar to the technique of the e-wrap on the KK's EXCEPT that you get the nice v-shaped stitch. An e-wrap is also called a twisted knit stitch because it is literally twisted. It forms a y-shaped stitch.
Loomers always have a lot of questions about our looms and how they work. We hope to answer some of your questions here.
 What makes the Kiss Looms unique is that they have an adjustable gauge. Gauge is set by changing how much yarn is used for each stitch. With regular looms this is done by changing the distance between pegs. The kiss loom starts out with a small gauge then uses gauge pins to increase the distance the yarn travels between pegs. The gauge is determined by this traveling yarn and by changing the settings on our looms you increase the amount of traveling yarn - and therefore change the knitted gauge.
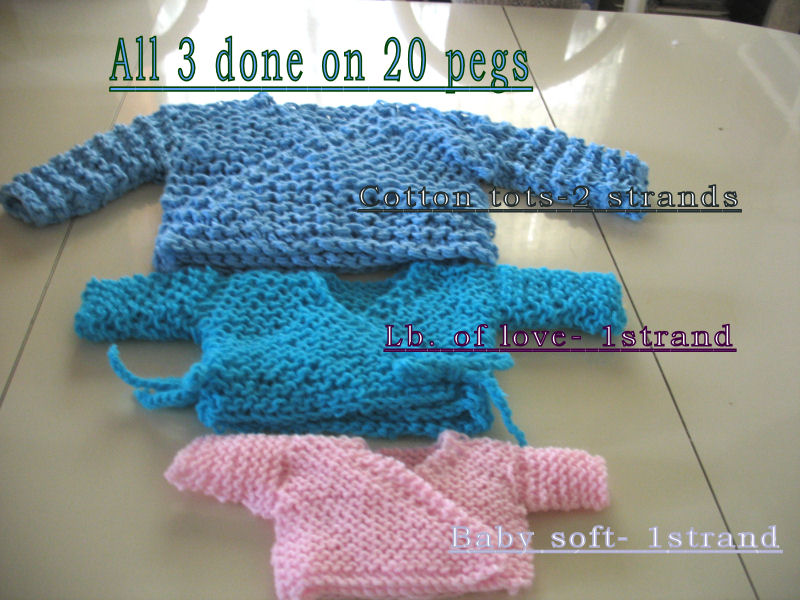
There are 3 basic settings that can be obtained just by changing the way the boards are assembled. Anything between the basic settings can be obtained using the supplied washers. This first Kiss Loom, a 20 peg board, was tested by Graciela Worth and the first project was the three sweaters above. All 3 were done on the same number of pegs using the 3 gauge settings on the loom.
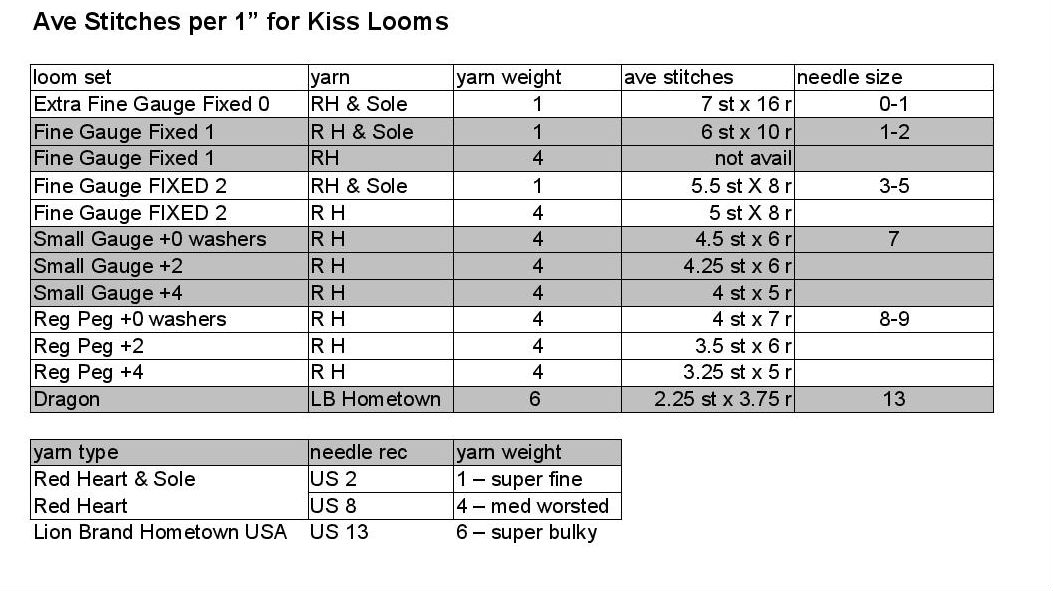
You can see from this chart the ave number of stitches per 1" that you can get by changing the peg style of the loom or simply by changing the number of washers between the boards.
General Overview of the Modular Loom
A modular loom also has the gauge adjustable feature as most of our looms but is a fixed number of pegs for knitting in the round. The great thing about the modular looms is that you can build a larger loom using the straight and corner brackets. Simply attach the modulars together into any number of pegs you need whether you are knitting a flat panel or knitting in the round. Want to knit a king size blanket in one panel? This is the loom for you. The smallest tube you can knit is a 24 peg (based on the 6 peg modular set of 4 6-peg sides).
General Overview of the 2-Way Adjustable Loom
The looms are adjustable in 2 different ways. One way is the adjustable gauge by adding or subtracting washers. The other way it is adjustable is by number of pegs to knit in the round. Our end pieces, whether a single peg slider or the larger ends can be be moved back and forth across the sides to change the number of pegs to knit. With the 1 peg sliders you can move it all the way down to one end to knit a 4 peg i-cord in the round.
General Overview of the Fixed Looms
The fixed looms are the only ones that are not gauge adjustable. In order to get the small gauge needed for sock yarns the pegs and pins must be on the same board. Remember, the pin system is what makes for a nice even stitch and allows you to wrap the whole row before knitting off. There are two types of fixed looms - fixed 1 and fixed 2. The fixed 1 is the smallest gauge you can get on a Kiss Loom. The fixed 2 is a slightly larger gauge and bridges the gap between the fixed 1 and small gauge looms.
General Overview of the Straight Loom
The straight loom was the original Kiss Loom. It is made to be used as a single rake or you can add the optional board and remove the pin board to use the loom as a double rake for double knit fabric. This loom is not compatible with the modular or 2-way adjustable looms.
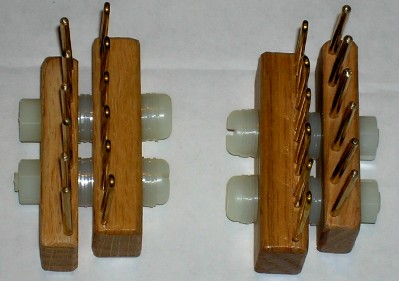
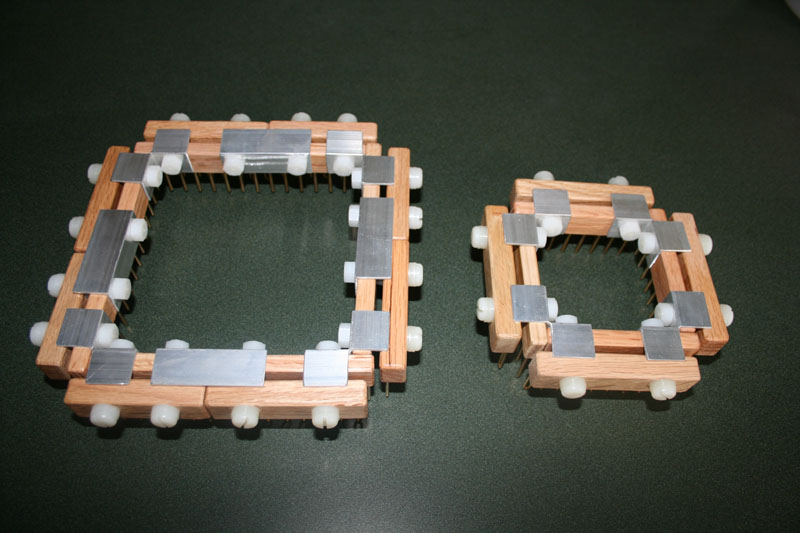
Does my loom come with hardware to adjust size and gauge? - Each of our looms comes with nylon washers (7 for each bolt) for gauge adjustment. The modular sets also come with corner brackets to attach the looms in a square for tubular knitting. Modular pairs do not come with any brackets (you will need at least 2 packages of straight bracket pairs to add the pairs to a set). The pictures below shows the two different types of metal brackets used in the modular looms, the straight L shaped brackets for the straight pieces and the "split" corner brackets to attach the corners of the loom. Check out the assembly instructions on the tutorials page for more information.
.jpg) |
 |
What is the smallest gauge I can achieve on the Kiss Loom? - Each knitter and each yarn used can affect the gauge of your knitted fabric. A swatch should always be made to check gauge before starting a project. The smallest gauge of loom is our extra fine gauge F0 loom. You can achieve roughly 8 stitches per inch using sock weight yarn with this loom. With our small gauge adjustable loom you can achieve 4.5 or 5 stitches per inch with a worsted weight yarn.
Can I use any pattern on a Kiss Loom? - Yes, knitting patterns, whether loom or needle, are not specific to the type of loom you are using. Any pattern can be done on the Kiss Loom - just make sure you knit a swatch to check that you are setting the gauge correctly to the type of yarn you are using.
Why isn't my loom fitting together right? - Make sure that you have assembled the loom in the proper order by following the assembly instructions. Do you have the same number of washers between each of the pin and peg boards? Are all the sides on the same setting (For mods - 1st setting, 2nd setting, or 3rd setting.) Check out the assembly instructions on the tutorials page for more information. If you are using end pairs your pins on the side and the end should line up at a 90 degree angle. Regular Gauge slider placement. Small Gauge slider placement.
I have lost some of my washers and/or screws. Where can I get new ones? - The washers are listed in the tools section of the website. If you need screws please email us - This email address is being protected from spambots. You need JavaScript enabled to view it.
How do you keep the yarn from coming up and slipping off the back of the pins? - That can be remedied by holding your finger on the yarn behind the pin as you knit off or placing one rubber band around the entire side of the loom you are knitting off, but only on the pins.
How do I set up my end pairs on my loom? - The end pairs have a notch to insert the sides. The end pair bolt can be tightened onto the side at any point along the length of the side. Make sure to line up the pins on the side at a 90 degree angle with the pins on the ends regardless of number of washers used.
How do I set up the 1 peg slider on my loom? - Regular Gauge slider placement. Small Gauge slider placement.
Didn't find an answer to your question? Feel free to email - This email address is being protected from spambots. You need JavaScript enabled to view it..
Classic Kiss Videos
Click the links to view the pdf tutorials in your browser or right click and select "save link as" to download them. Scroll toward the bottom of the page for videos.
How to Use the Kiss Loom - instructions on stitches and how to knit them on the Kiss.
How to Assemble the Kiss Modular Looms
Getting to Know your Modular Loom Settings
How to Cast On and E-Wrap on Your Loom
Non-Loopy/Double E-Wrap Cast On
Basic Bind Off on the Kiss Loom
How to do Bobbles on the Kiss Loom
yo, ssk and k2tog, yo (alternate method for when slant doesn’t matter)
KFB Increase (Knit into the front and back of stitch)
Sock Loom Worksheet with Negative Ease
Please join us on our Facebook Group for loom knitting discussion!
Video Instructions
Introduction and Assembly
How to Assemble the Kiss
Kiss 2-Way ADJ and the Purling Tool
Cast On's
E-Wrap Cast On and u-Stitch
Double E-Wrap Cast On (non-loopy) and U-Stitch
Long Tail Cast On
Tubular Cast On
Crochet Cast On
E-Wrap Cast On on the Sock Loom
General Stitches
E-Wrap Cast On
Knitting and Purling on the SG Slim
Increasing and Decreasing in the Round
Make 1 (M1) Increase
Mock Crochet Stitch
Tuck Ribbing
1x1 cables
Bind Off's
Super Stretchy Bind Off by Kelly
Basic Bind Off for the Kiss Loom
Other Techniques
Basic Hat Knit a Long on the Kiss Modular Loom
Kiss Looms and Heels - Short Rowing a Heel and Toe
Tips: The Fabric Doesn't Flow Down
Kiss Looms is home to the 2-Way Adjustable Gauge Loom! Our looms were designed with the Kiss principal in mind. Keep it simple! Our looms allow you to change your gauge for any project, while still using the same loom. Knit with sock weight yarn using our fixed gauge looms or get an adjustable loom to knit from sport weight to super bulky!
Any questions? Not sure what loom to get? We love helping you with suggestions.Feel free to email us at: orders@kiss-looms.com