
Kelly Jones
Christmas Scrubby
CHRISTMAS SCRUBBY ON THE KISS TRIANGLE LOOM
This is a pattern to make a scrubby with the KISS 20 Peg Triangle Loom
Its a perfect Christmas present
Fun,easy and fast to make
Tools :
- KISS 20 peg Triangle Loom
-Crochet hook that comes with the KISS Triangle Loom And crochet hook size : US 10,5 - EU 6,5mm
-Needle (best to use a wool needle)
Materials :
-2 Scrubby yarns :Using Green Sparkle Scrubby yarn (+-30 yards) And Red Sparkle Scrubby yarn (+- 2 yards)
Instructions :
- Take your KISS Triangle loom
- Take the green Scrubby yarn
-
DOUBLE stranded !!
-Tie a knot on the beginning of your double stranded yarn,so it keeps it good together to weave easily
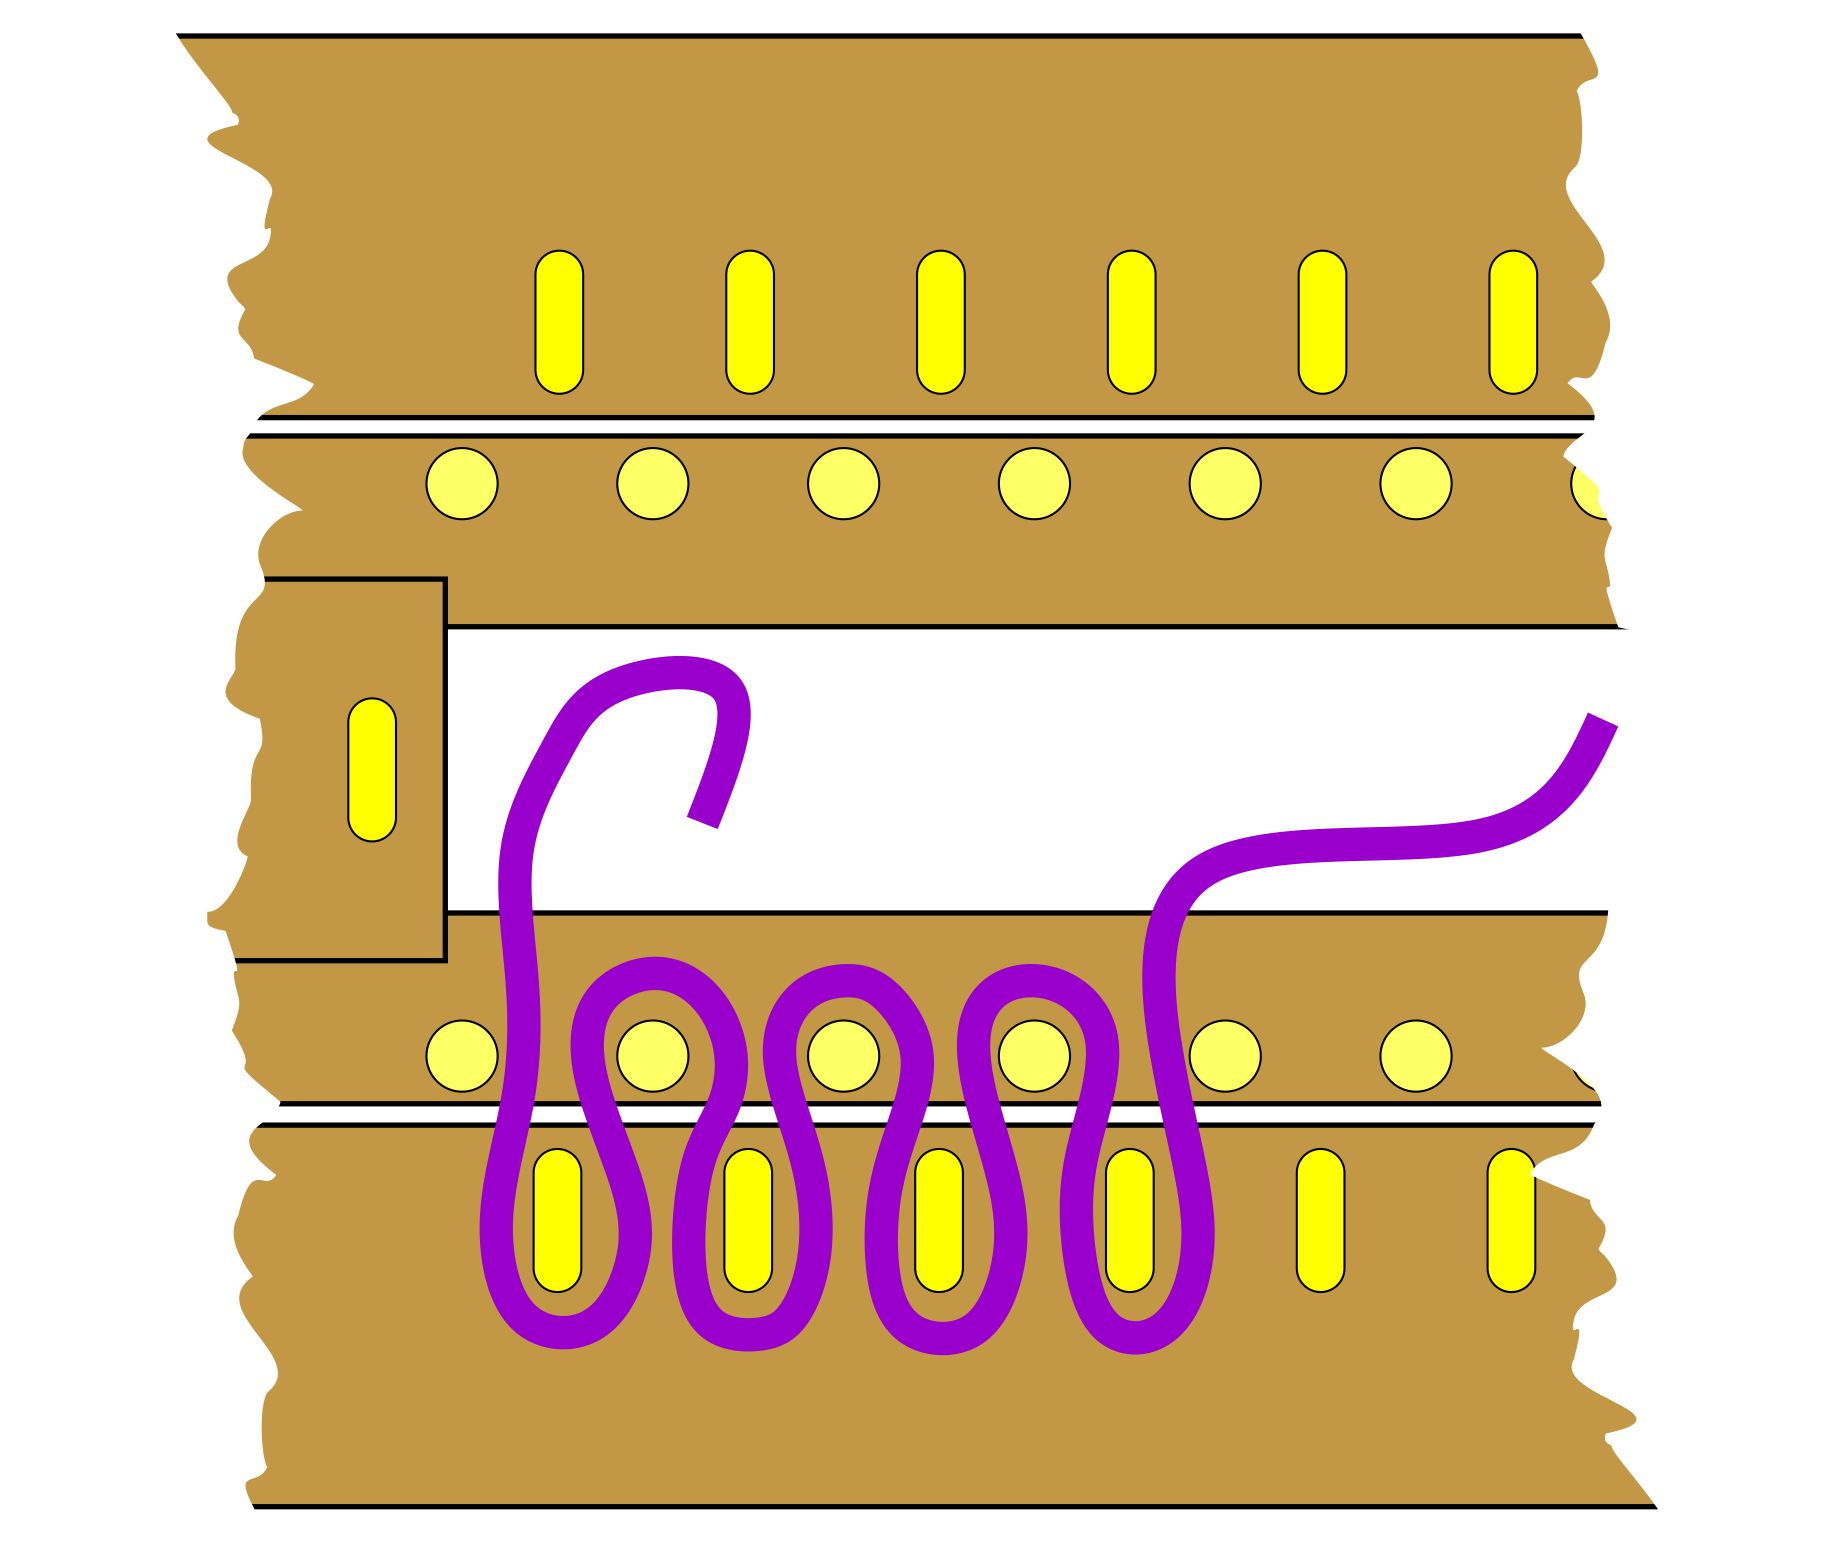
-Start weaving with your double stranded yarn, Its the same way as single stranded but don't forget to go OVER-UNDER 2 threads each time
Here is a picture of the weaving:
-When the weaving is finished, bind off the threads And remove the Triangle from the loom
-Make a second Triangle exact the same way
-When this Triangle is finished
-Take both Triangles and take the Red Scrubby yarn
-Use crochet hook : US 10,5 - EU 6,5mm
-Place the longest sides together and take your crochet hook and start with the Red Scrubby thread SINGLE stranded and crochet it together with a single crochet stitch
This is a great youtube video that explains how to crochet 2 pieces together with single crochet: Joining Squares: Single Crochet
We are already at the last part and that is to sew in the ends.
It is handy to use wool needles because they have a bigger eye and that is easier to work with because of the two stranded threads and the thickness of the wool needle makes it easy to go through the scrubby to sew in the ends.
Now you're finished,congratulations!
I hope you will enjoy using the scrubby or make it as a present for your family and friends.
Its a beautiful Christmas present and you can make a few scrubby's and gift it together with a dispenser with wash gel and a small bowl to put in the scrubby's and dispenser.
Enjoy weaving!
Sparkling Mother's Day
Its perfect for the Mother’s Day table. A fun, fast to make and easy project.
Tools :
-KISS 20 Peg Triangle Loom
-Crochet hook and comb that comes with the KISS Triangle Loom
-Needle (best to use a wool needle)
Materials :
-Drops Andes yarn (I used color way Misty Rose)
-Durable Glam - Byclaire nr.3 sparkle 261 lilac
Instructions napkin holder :
-Take the two yarns together, to make easier put a knot at the beginning of the yarn, this way the yarn s†ays together
-Now you can start weaving your triangle, you always use the two yarns as it is one yarn
-When you weave over and under in the length, then you have to be careful that you go over and under the 2 threads because otherwise you will create loops and you will have to restart
Tip : to avoid any mistake, check every row before starting your next row
-When you finished weaving the triangle, weave in one end
-Take the two longest points and make a round of the triangle, now you place one point over the other, take the point with the thread and take your wool needle, now you sew both layers together by doing an invisible stitch, make a knot and sew in ends, cut off the thread
Congratulations your napkin holder is ready.
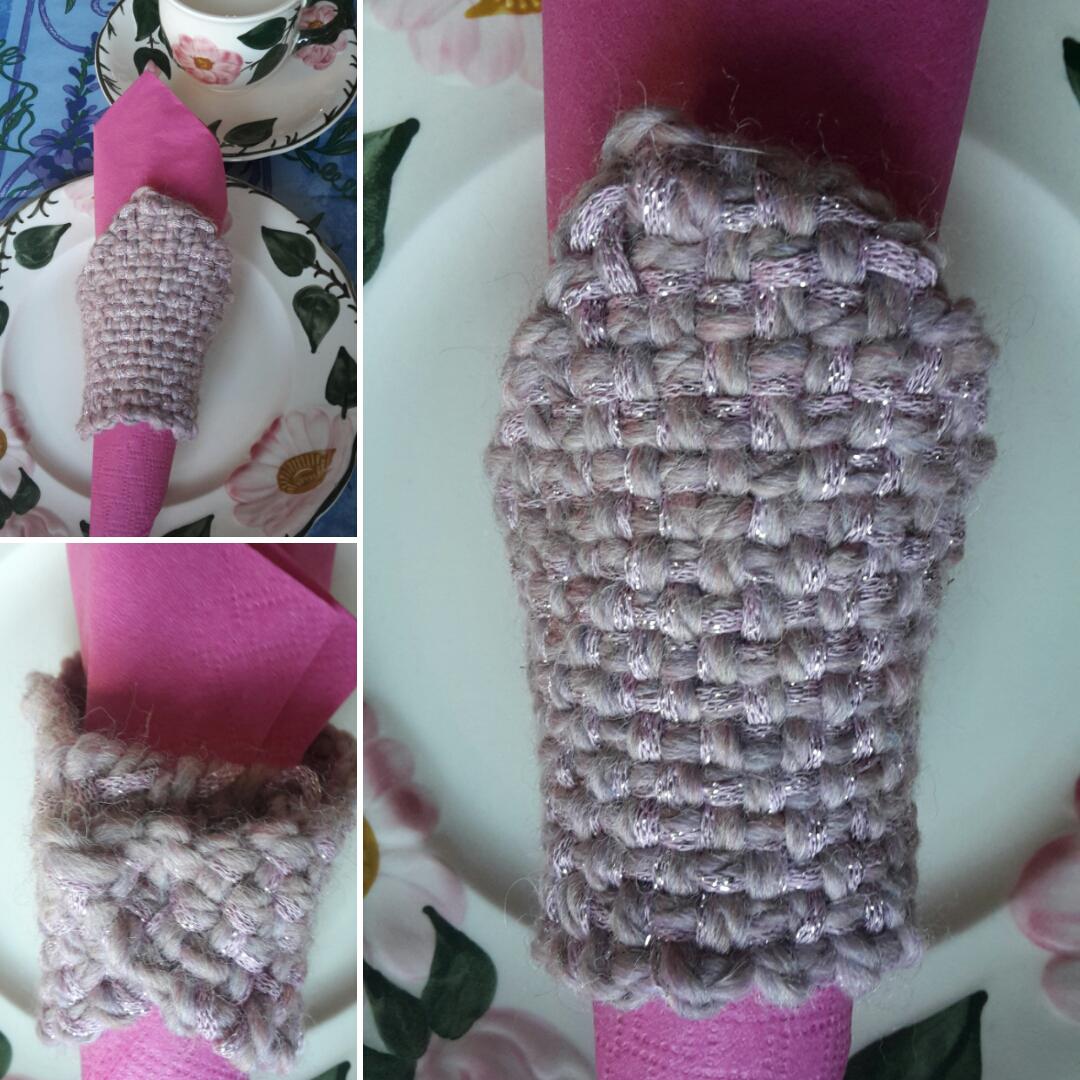
On the picture above (the second picture at the left) you see the back of the napkin holder where you sew the points together.
Instructions Coaster :
-Take the two yarns together, to make easier put a knot at the beginning of the yarn, this way the yarn s†ays together
-Now you can start weaving your triangle, you always use the two yarns as it is one yarn
-When you weave over and under in the length, then you have to be careful that you go over and under the 2 threads because otherwise you will create loops and you will have to restart
Tip : to avoid any mistake, check every row before starting your next row
-When you finish the triangle sew in the ends
-Make a second triangle , with this triangle, before you start, leave a long tail of about 5inch or 15 cm at the beginning, now you can start weaving the same way as you wove the first triangle
-When you’re finished , sew in one end, leave the beginning thread with the long tail on the triangle
-Take your wool needle and use the beginning thread (loop of 5’’- 15cm) to sew the triangles together
-Place the 2 triangles on each other and sew the longest side with the beginning thread to each other by using a overhand stitch also known as twist stitch
-Sew in the ends and cut off the threads
Congratulations your coaster is ready.
Now you can make more napkin holders and coasters for the family to have a lovely Mother’s Day table.
Its also perfect for other celebrations like for example a birthday or for Christmas/New Year’s Eve with a gold or silver sparkling yarn.
Its also nice to gift a set of the coasters or the coasters together with the napkin holders.
Its a perfect gift for family and friends because we always love more coasters and napkin holders.
I hope you all enjoy making this pattern.
Happy weaving.
Kiss Bookmark
-Materials :
-Loom Hook
-Yarn US 6-7 and EU 4,5 - 5mm I used Durable Brilliant Glam
- Wool Needle
- Scissors
Extra materials :
-Charm (I used a yarn ball with knitting needles charm)
Stitches :
S : Skip one peg
K : Knit (ewrap)
HS : Half Stitch
Instructions :
Cast on 6 pegs (leave a long loop so you can attach the charm at the end)
S1, K4 , HS Repeat this row 30 times or until the desired length
After the 30 rows are done Bind off
Take the wool needle and sew in the end Adding the Charm
Use the yarn from the cast on, cut until the desired length
And add the Charm using a needle that you put into the charm from the front side to the back side, so the needle with yarn comes out on the back side of the charm. This way you can finish it nicely with 2 knots and then cut the rest from the yarn.
Your Bookmark is finished.
Enjoy using it in your books or it is a nice present to gift to your family or friends.
Happy looming.
Jingle Snowman
PATTERN INSPIRATION:
I started out with a ball but wanted it to be a flat circled ball and by pinching in center of the ball and tying it off, I was able to create what I was looking for.
Hope you enjoy this pattern as much as I enjoyed creating it. For any questions email
This email address is being protected from spambots. You need JavaScript enabled to view it.
Kiss Mas Grinch
PATTERN INSPIRATION:
Oh how I loved Christmas as a kid, it was and is my favorite time of the year. I wouldn’t and don’t ever miss watching the Grinch stole Christmas, the Grinch was always a favorite of mine and what better way to keep the child in me per say but to loom knit this character on my favorite loom the Kiss Loom.
Hope you enjoy this pattern as much as I enjoyed creating it. For any questions email
This email address is being protected from spambots. You need JavaScript enabled to view it.
Nostalgia Half Linen Mitts
PATTERN INSPIRATION:
This pattern was created because of my good friend Monique Paters-Issverdink and her creating this new lovely stitch the half linen stitch and wanted to do it in the round so this is what I came up with using her new stitch. Thanks Monique this can make fantastic finger less mitts or hats, washcloths, tea towels, pot holders (USE COTTON YARN) or even a blanket.
Hope you enjoy this pattern as much as I enjoyed creating it. For any questions email
This email address is being protected from spambots. You need JavaScript enabled to view it.
Country Calm Fingerless Mitts
PATTERN INSPIRATION:
This pattern was created in regards to a crochet pattern I saw online last fall in one of my many quests of looking at patterns, so this is what I came up with based on what I saw.
SIZE: Medium hand
GAUGE: 4.5 stitches per inch
MATERIALS NEEDED:
Loom pick
Tapestry needle
Yarn Guide: this works excellent for maneuvering the working yarn when doing the Half Linen stitch you will have a better control of the working yarn
Row counter a must
Latch tool or a small crochet hook for doing the Loopy crochet bind off
Yarn: 1 Skein Worsted weight medium 4 yarn (In sample I used Bernat Hiking color Camo
1 Skein Worsted weight medium 4 yarn (In sample I used Red Heart color Hunter Green
1 Skein Worsted weight medium 4 yarn (In sample I used Red Heart color Dark Brown
Loom: Kiss 30 Peg Small Gauge Short 2-Way Adjustable Loom or the 60 Peg Small Gauge 2-Way Adjustable Loom using no washers makes this a 3/8” gauge loom
Pattern:
Cast on 30 pegs either with the long tail cast on method or the Dbl E-wrap cast on method with camo yarn.
Row 1 - 10 K1,P1
Switch to hunter green yarn
Row 1: k
Row 2: k
Row 3: p
Row 4: k
Row 5: k
Row 6: p
Switch to Dark Brown yarn
Row 1: k
Row 2: k
Row 3: p
Row 4: k
Row 5: k
Row 6: p
Switch to camo yarn
KNIT FLAT PANEL K 9 rows
Begin to KNIT IN ROUND again
Rows 10-14 knit
Finish With A Eyelet Edge knitting in the round
Deb’s edge: E-wrap around 3 times each peg, all pegs will have 3 loops.
Row 1: Knit 1 over 2.
Row 2: Purl all pegs, treating the 2 loops on each peg, as one.
Row 3: e-wrap all pegs and knit off.
Row 4: Transfer loop from peg 2, to 1, loop from peg 4 to 3 and so on, now only every other peg is occupied by 2 loops. E-wrap all pegs and knit off 2 over 1, the pegs that have 3 loops on them.
Row 5 to 7: e-wrap and knit off. (1 over 1)
Row 8 purl
Loopy crochet bind off:
Step One: Peg one with working yarn chain 9 stitches working on front side of pegs (ONLY)
Step Two: Place the 9 stitch chain on left side of the peg to face to the inside of loom go behind the pin like doing a u-stitch place chain on peg 2, K peg 2 (and for the repeat of row 2 on all other pegs once the 9 stitch chain is added to the peg)
Step 3: Peg 2 chain 9 repeat step 1 and 2 so all pegs remaining have a 9 stitch chain on each peg.
Photo tutorial on how to do the Loopy crochet bind off: Country Calm Fingerless Mitts Pattern
BIND OFF: Bind off after all pegs have a 9 stitch chain on them by doing a super stretchy bind off.
Hope you enjoy this pattern as much as I enjoyed creating it. For any questions email
This email address is being protected from spambots. You need JavaScript enabled to view it.
Here's Looking At You
PATTERN INSPIRATION:
This pattern was created in regards to a crochet pattern I saw online last fall in one of my many quests of looking at patterns, so this is what I came up with based on what I saw.
SIZE:
Height 6.5” Head Size 19”
GAUGE: 2.25 stitches per inch x 3.75 rows per inch
Yarn:
1 Skein Worsted weight medium 4 yarn (In sample I used Red Heart color Black
1 Skein Worsted weight medium 4 yarn (In sample I used Red Heart color Buff
1 Skein Worsted weight medium 4 yarn (In sample I used Lion Brand Fun Fur Prints Color Sand Stone
Loom: Kiss 24 Peg The DRAGON Large Gauge Hatchling Loom
Supplies:
Loom pick
Tapestry needle:
2 cups uncooked rice
Knee hi stocking: for polyfil and rice
Polyfil: Small amount
Hot Glue Gun and Glue Sticks
Row counter a must:
1 pair of glasses Dollar store sells readers for a dollar the squared off kind looks the best
Wiggle eyes size to be proportioned with your glasses choice
Stick pins to attach ears and nose and mouth before hot gluing them onto head
HEAD:
Drawstring Cast On 24 pegs
Knit 40 rows
Pull drawstring closed on this end and tie off hide yarn tail inside
Drawstring bind off leaving this end OPEN
Place 2 cup rice into the knee high
Place knee high into the head
Place polyfil in knee high on top of the rice and form your head into a ball keeping the rice to the bottom so your head will remain weighted down so it sits on a table and can’t roll. When shape is achieved to your liking tie off the knee high and place knee high into the head you knitted, set aside
NOSE: Create leaving a 2”tail, (1) 4 peg icord
Knit icord for 2.5“ tie together ends, hide tails in icord
Ears: X2
Create leaving a 2”tail, a 4 peg icord 4.5“ long
Shape the head so the eyeglasses can sit onto the nose and the ear piece of the glasses sit onto the ears. Close the drawstring of top of head
Mouth: Create leaving a 2”tail, a 2peg icord 6.5“ long
HAIR X 2
With fun fur make a slip knot leaving a big enough loop to fit around your 3 middle fingers wind the fun fur around these 3 fingers creating a loop wrap 6x around the 3 fingers cut yarn.
Repeat above for 2nd set of hair
EYES: X2
I used a piece of tape and put it on back side so I could see where the eyes needed to be on the head.
EYE BROWS: X 2
Using fun fur measure a 10” piece fold in half create a slip knot crochet 6 chains pull end tight after 6 chain and cut the tail off on both sides of the 10” piece.
Place ears onto head using pins to hold into place, curving it too resemble an ear and shape onto head
Put eyes with tape on backside of wiggle eye onto head
Pin nose onto head
Place glasses on face to see that everything looks in place like a face should look
Pin mouth to head
Pin eye brows to head
HOT GLUEING ONTO HEAD
Begin with the ears hot glue them onto head curving it too resemble an ear shape
Now the nose hot glue to head
Now the eyes
remove the tape and hot glue to head
Now the mouth hot glue to head
Now the hair scrunching it together hot glue to head
Eye brows hot glue to above the eyes creating an arch
That’s it you now have a Here’s looking at you eye glass holder
© June 12, 2017 Kathy B.Bouras
Hope you enjoy this pattern as much as I enjoyed creating it. For any questions email
This email address is being protected from spambots. You need JavaScript enabled to view it.
Let's Get Started
If you are a new Kiss loomer or first time loom knitter we wanted to give you a page with some very basic beginner information. We hope this helps you. If you would like more in-depth instructions or additional instruction please visit our Learn tab for Videos and FAQ's. One of the most important things you need to learn in knitting is "what is gauge and what does it mean". I highly recommend you start with this document before knitting on your loom. It explains whey having a gauge adjustable loom is an amazing tool to have! - Let's Talk About Gauge.
Looking for Weaving information? Take a look at our videos here.
Loom Knitting Videos - see below
So I have this loom - now what do I do?
Your loom comes boxed ready to knit on with 0 washers between the peg and pin boards. If you have a Small Gauge Loom, Regular Gauge Loom, or Modular Loom you have the option of adding washers. We include up to 7 washers per location on the bolts. Longer looms - 60 or 77 SG, 40 or 53 Reg, and our larger 40 and 60 peg Modular Looms all have a pin (or multiple pins) on the side of the pin board board - this is to hang washers on - see video below.
You don't need to add washers or ends on your loom before giving it a try! So feel free to just grab some yarn and follow along below. We recommend starting on one side first. Once you see how the yarn works on the loom it will make more sense on the corners. This document will help you with setup on the 1 peg slider - Slider Setup. When you are ready to add end pairs take a look at this video for setup.
Casting On
I recommend starting with a double e-wrap cast on, also called a non-loopy cast on. This will give you a nice clean cast on edge and is a typical cast on you can use for most projects. The U-stitch cannot be used as a cast on because it is open and will unravel. For other options on cast on's visit the learn tab.
Knitting
The most typical stitch you will use is a u-wrap knit stitch. The u-wrap stitch will give you a nice V shaped stitch (e-wrap gives you a y-stitch). This stitch is smaller than an e-wrap but a little larger than a traditional knit stitch (reverse purl). Just practice knitting back and forth for a while to get used to the "in front of the peg, behind the pin" motion. Remember do not wrap the outside pin, stop at a peg - see picture and video below. When you turn you can slip the first stitch or knit the first stitch. If you are seaming a future project you will need to knit every stitch. The video shows a great explanation of how to do this.
U-Wrap Stitch
Slipping & Knitting First Peg
Here is a closeup video of how the pin system works and how the fabric flows down the back of the loom. At first you will notice the yarn piling up a bit, but if you tug down a little in back it will come loose easily unless you've snagged a pin.
Purling
Next you can try purling on your loom. To make a fabric that won't curl on the edges you will need to make some sort of knit and purl combination to keep the fabric flat. There are many options on this but the most common is the garter stitch. For the garter stitch you knit one row across, then purl the next row. You repeat this knit and purl pattern for the edges or your whole project. The purl will form a vertical line on the front of your fabric and will sit higher than the knit stitch creating little ridges.
Binding Off
Binding off is the process you use to close up your knitting to take it off the loom. There are many different bind-offs you can choose from. We will look at one here, but you can view others under our LEARN tab. This video shows the basic bind off. Make sure to keep your stitches loose. The super stretchy bind off is another alternative easy bind off that provides a nice tight looking bind off with plenty of stretch. It's great for cuffs and collars especially. It also pairs nicely with the double e-wrap cast on for a similar looking edge.
Now What?
So you now have all the basics covered! Congratulations!!!! After you feel comfortable with knitting and purling it's time to start a project! We have a few on our pattern page to help you get started. As always we hope you enjoy your new loom and if you ever have any questions please do not hesitate to ask! This email address is being protected from spambots. You need JavaScript enabled to view it. or join us on our Facebook Club.
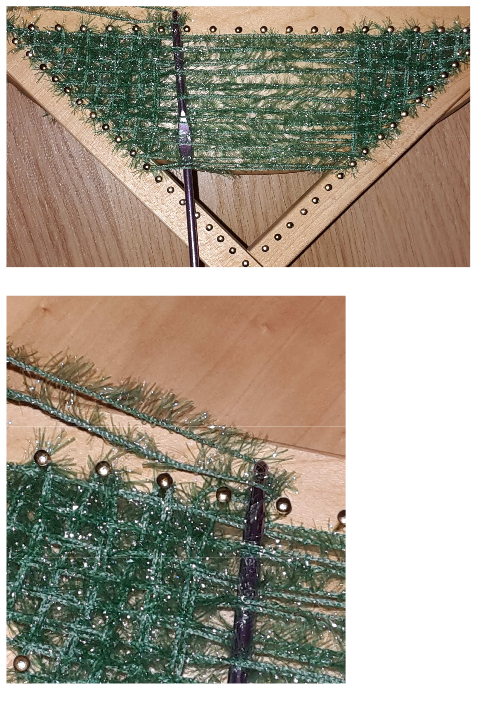
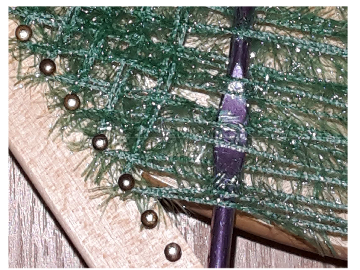
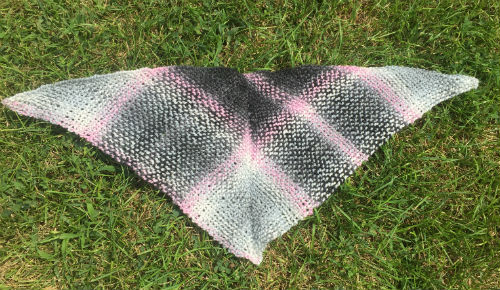
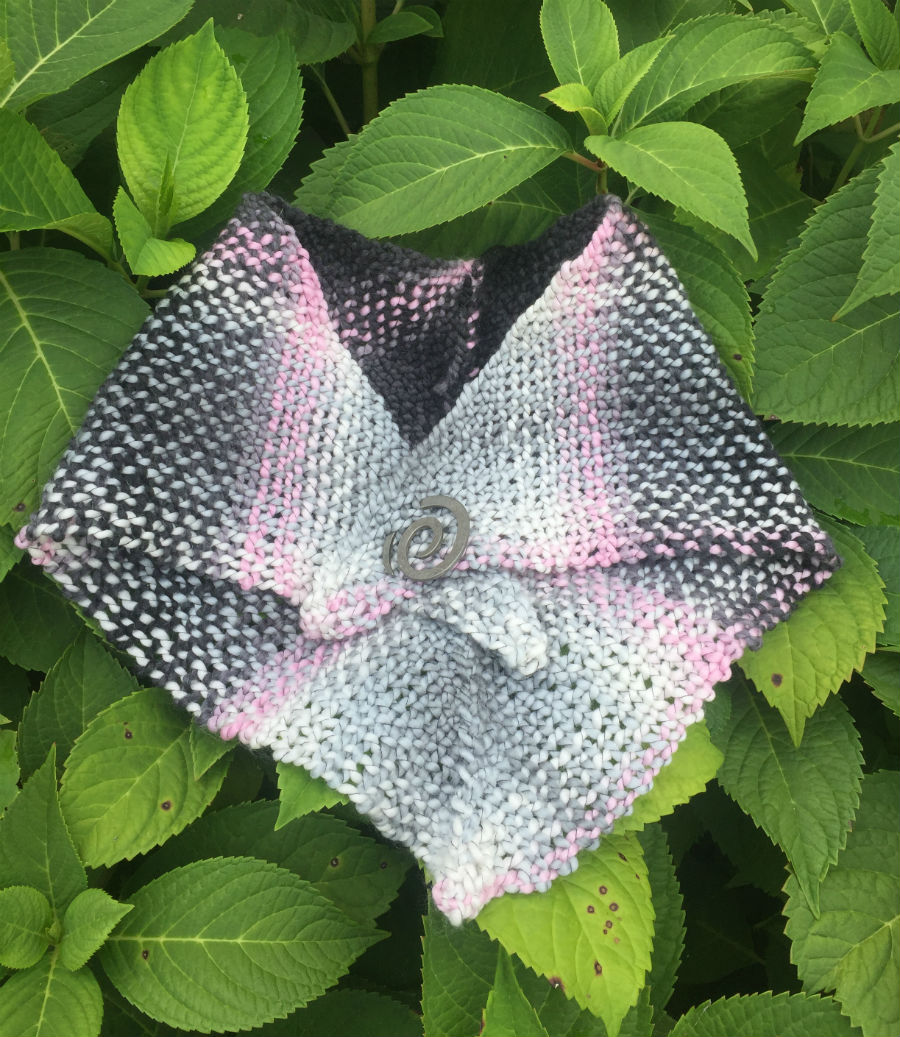
Ruthie's Woven Triangle Shawl
Ruthie's Woven Triangle Shawl
by Kelly Jones ©August 2017
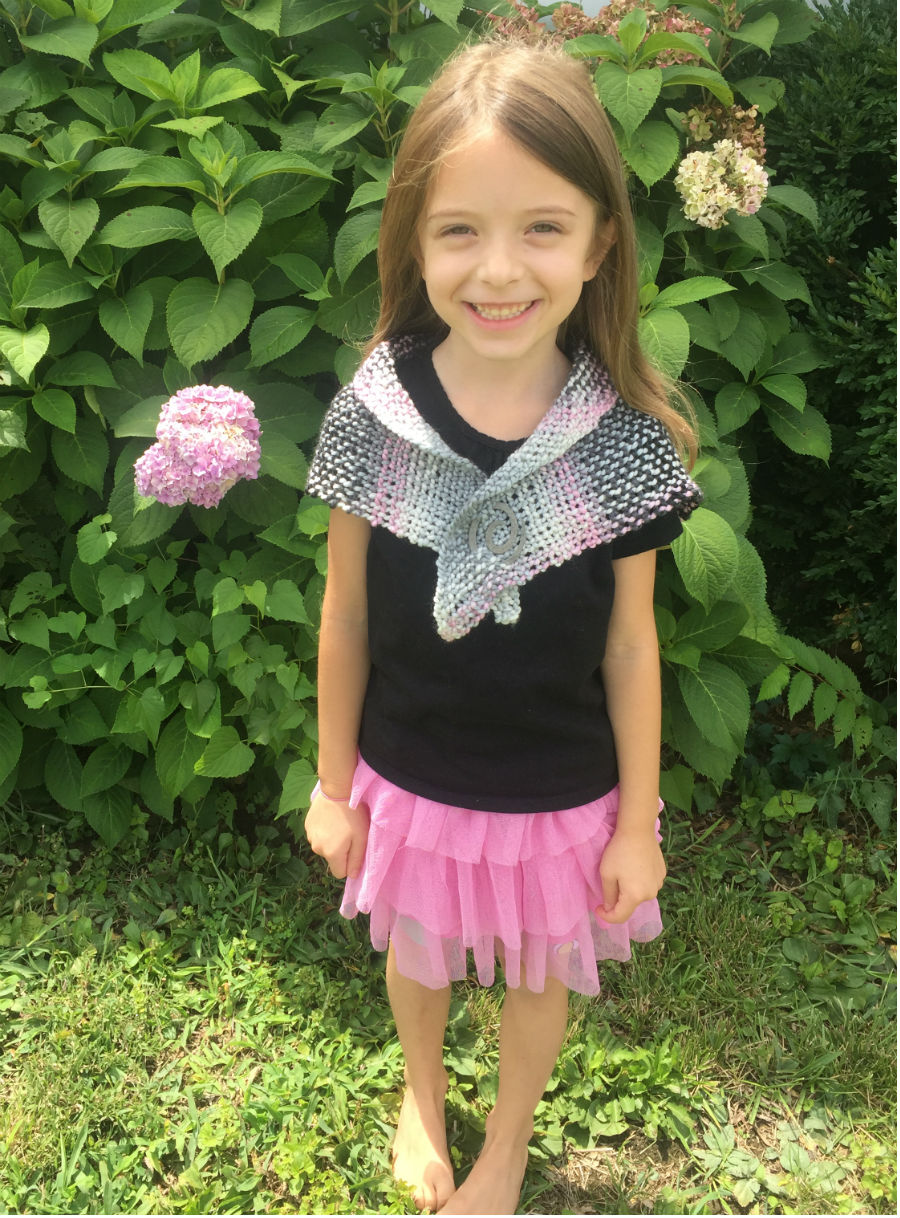
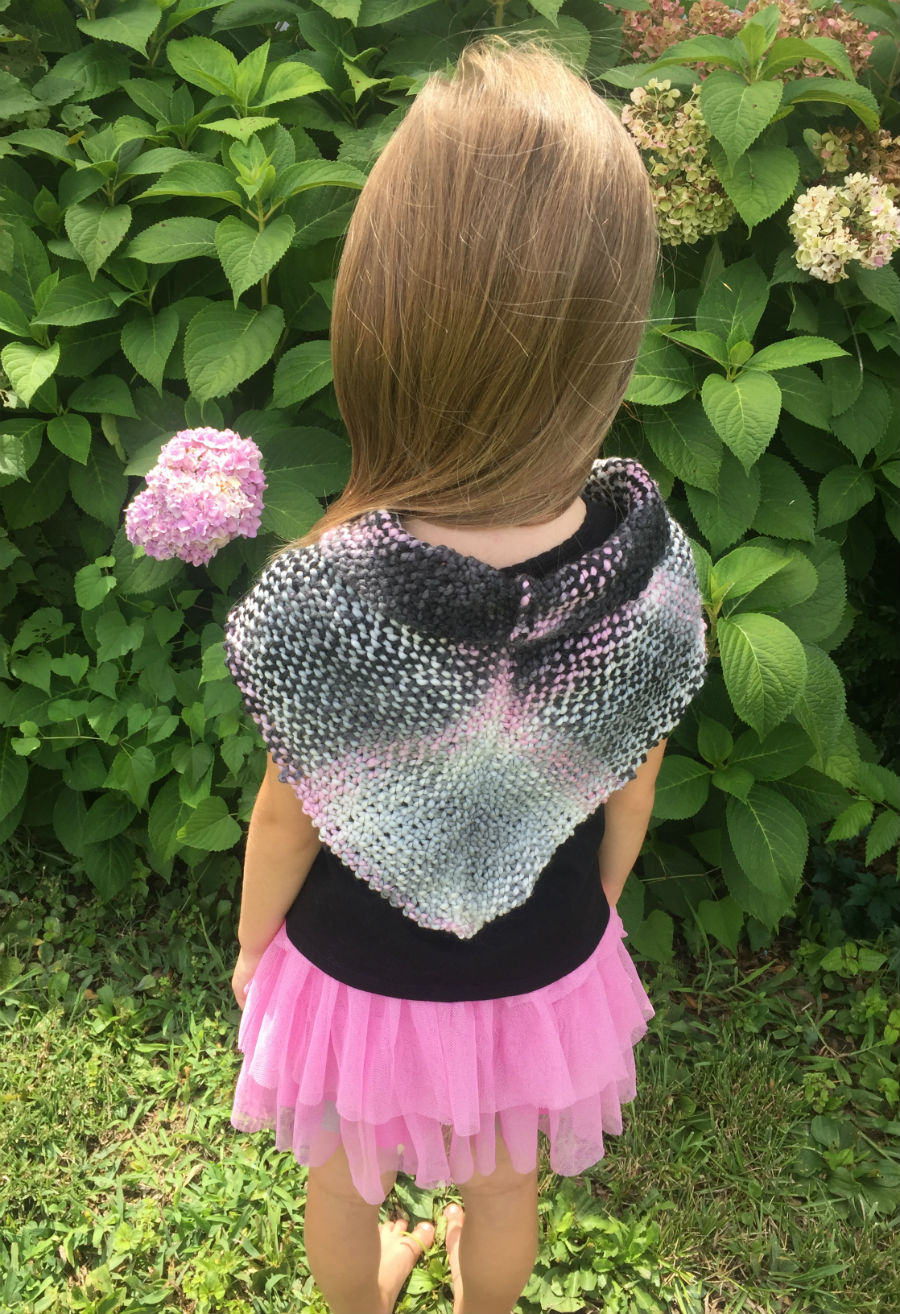
Weave two large triangles on the 50 peg Triangle Loom.
Crochet together with long angles facing out and points at the top center – as shown in photo.
Tuck in all tails securing ends.
Use with a shawl pin to secure.
Size – 31” wide, 14” high
Kiss Looms is home to the 2-Way Adjustable Gauge Loom! Our looms were designed with the Kiss principal in mind. Keep it simple! Our looms allow you to change your gauge for any project, while still using the same loom. Knit with sock weight yarn using our fixed gauge looms or get an adjustable loom to knit from sport weight to super bulky!
Any questions? Not sure what loom to get? We love helping you with suggestions.Feel free to email us at: orders@kiss-looms.com