
Kelly Jones
Woven Bottom Party Bag
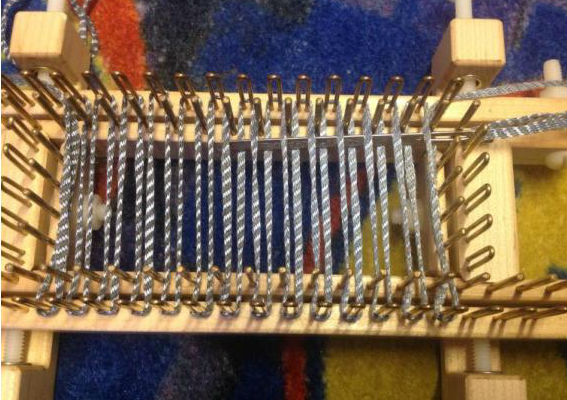
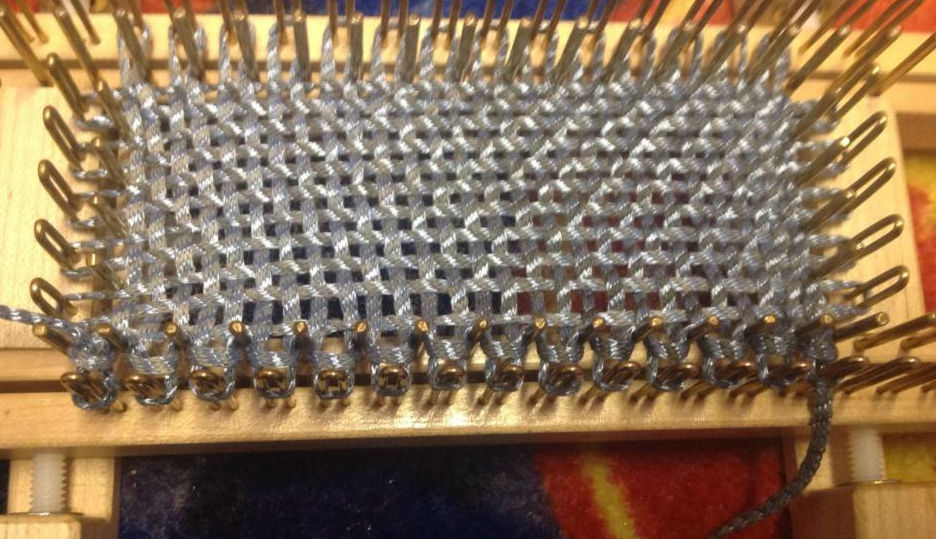

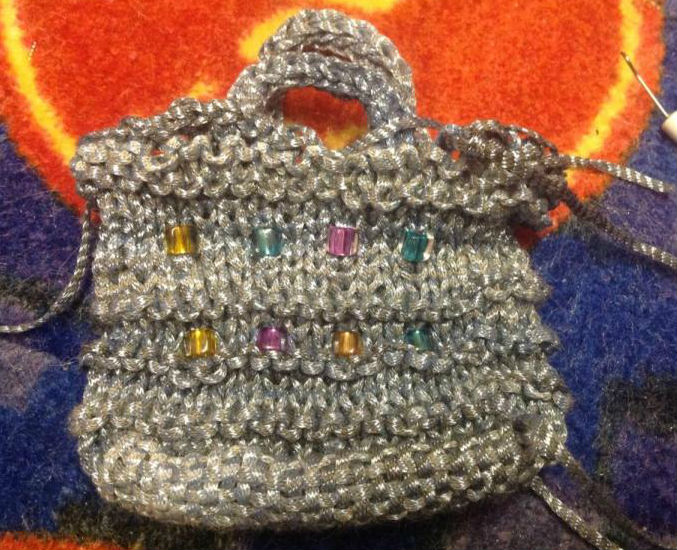
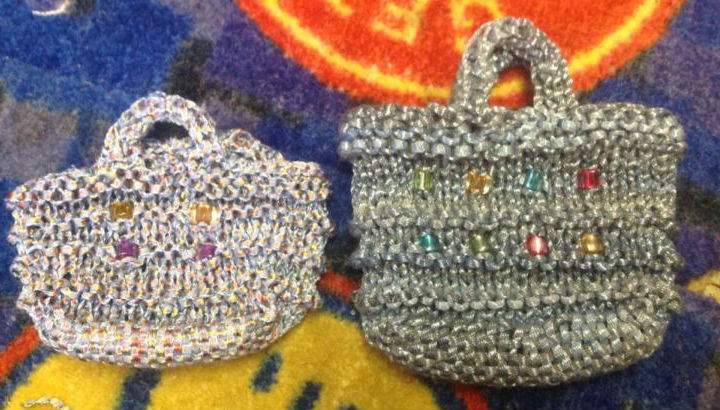
Summer Purse
Summer Purse
by Angel Philipp ©2009
A perfect knit purse for all the ladies in your life. Use machine washable yarn for easy care.
For more of Angel's patterns visit: angelphilipp.wordpress.com
The slip 1 knit 1 pass slipped stitch over row is knit peg by peg. Take your working yarn behind peg 1wrap and knit off, move this loop to peg 1 and knit off, wrap peg 2 and repeat around.
Set up your Kiss for knitting in the round on the first setting, no washers and 78 pegs. I used 4 15 and 2 9 peg modules. Use masking tape to label pegs 1 - 39.
Round 1 - K1, Slp1 with yarn in front.
Repeat around
Round 2 - K
Repeat these 2 rounds until round 14 ending on a knit row.
Change to contrast yarn.
Round 15 - yo, K2tog around
Round 16 - K
Round 18 - K
Repeat these 4 rounds twice.
Change back to main yarn.
Round 27 - K1, Slp1 with yarn in front. Repeat around
Round 28 - K
Repeat these 2 rounds until round 38 ending on a knit round
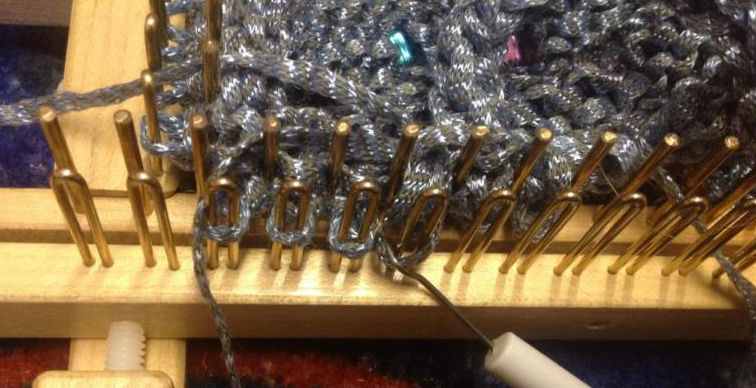
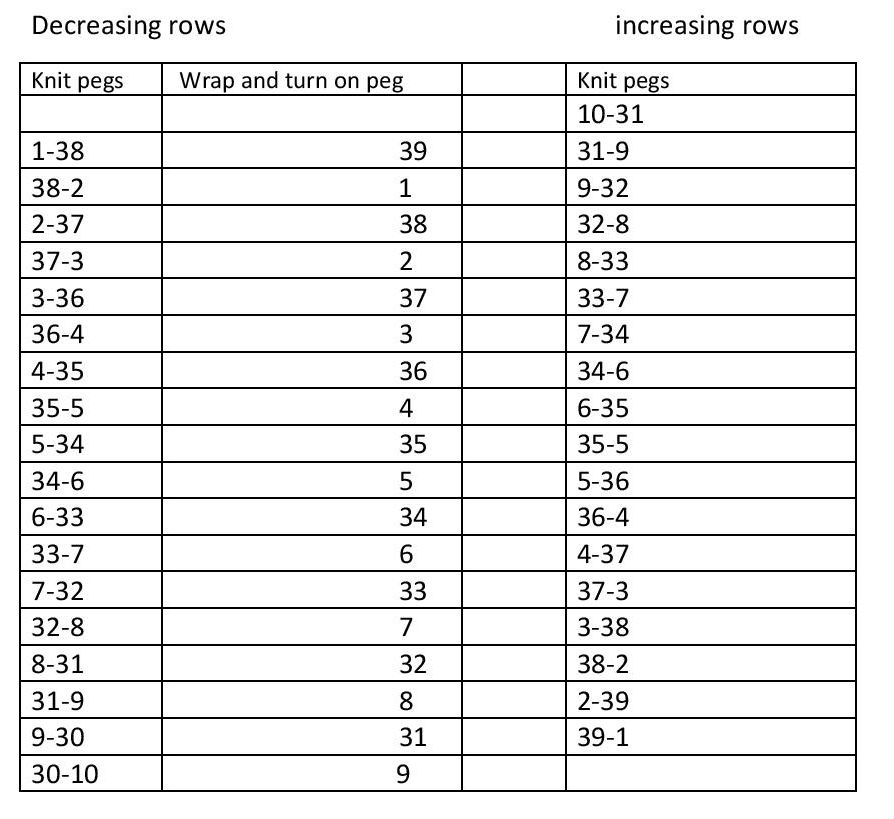
The flap of the purse is knit in a flat panel.
You will begin knitting on half the stitches pegs 1 - 39.
Row 40 K
Row 41 - 72 Continue knitting in the established pattern, decreasing 1 stitch on each side every 3rd row.
Rows 73 - 80 Continue knitting in the established pattern, decreasing 1 stitch on each side every other row.
There should be 9 stitches left, bind these off using the simple bind off.
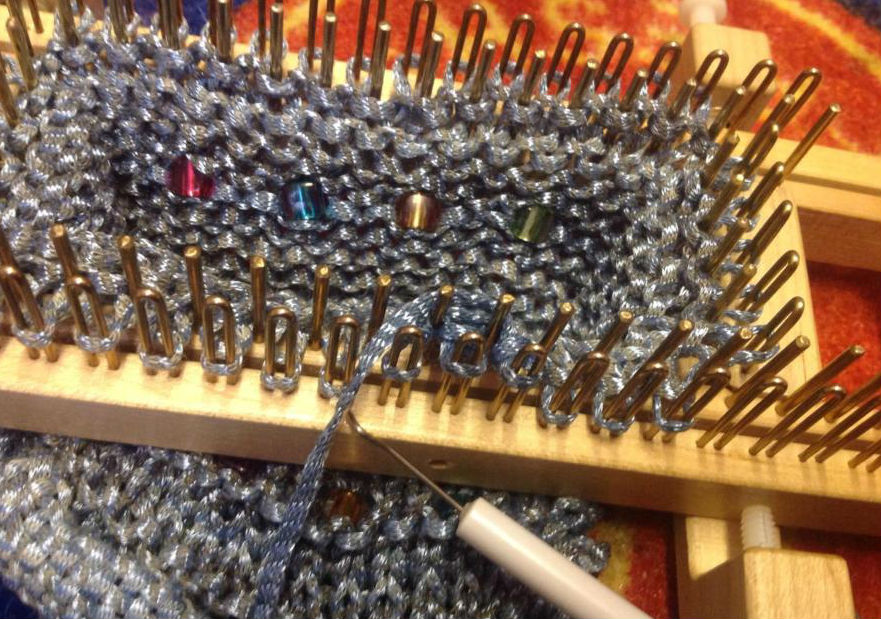
Mock Horse Shoe Lace Cowl
Mock Horse Shoe Lace Cowl
by Graciela Worth ©2012
This beautiful cowl created by Graciela is made with Patons Lace yarn on a Fixed 2 Fine Gauge Loom with 130 pegs in the round.
For more of Graciela's patterns visit: gracielandcrafts.typepad.com/my_weblog/
Materials:
1 skein, Patons-Lace – 19 wraps per inch.
A little bit of 2 yarns on contrasting colors on about the same weight as the main yarn
Fine gauge loom, with 130 pegs to knit on the round. Sample was done on Kiss Fixed 2.
Pick
Row counter, or means to keep track of row
Yarn needle
Finished dimensions: Width of the tube: 12.5” Length: 15”
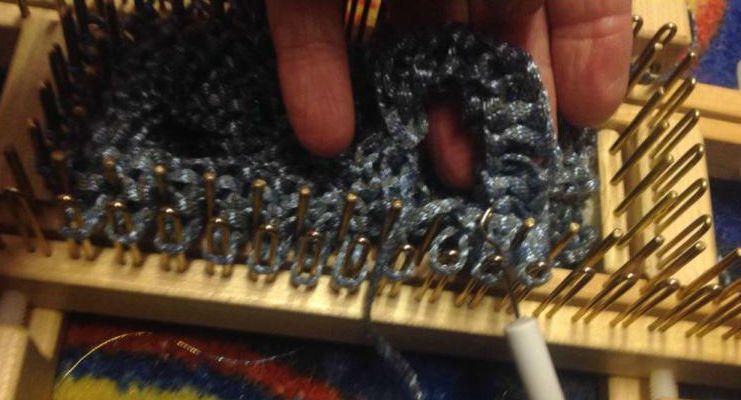
Instructions for Mock Horse Shoe Lace:
Read all instructions before starting.
Cast on multiples of 10 stitches.
You might want to mark the loom, using masking tape, doing this helps to go faster and keep track of your place.
Row 1 and all odd rows: wrap for cont. u-stitch and knit off.
Row 2: Move loop from peg 7 to 6, and peg 5 to 6.
Now move loop from peg 4 to 5, from peg 3 to 4, from peg 2 to 3, from peg 8 to 7, from peg 9 to 8 and from peg 10 to 9: pegs 2 and 10 are now empty. Wrap all peg for cont. u-stitch and knit off, peg 6 will have 3 wraps, on this peg you knit 2 over 1.
Row 4: Move loop from peg 7 to 6 and from peg 5 to 6. Now move loop from peg 4 to 5, from peg 3 to 4, from peg 8 to 7, and from peg 9 to 8: pegs 3 and 9 are empty. Wrap all peg for cont. u-stitch and knit off, peg 6 will have 3 wraps, on this peg you knit 2 over 1.
Row 6: Move loop from peg 7 to 6 and from peg 5 to 6. Now move loop from peg 4 to 5, from peg 8 to 7: pegs 4 and 8 are empty. Wrap all peg for cont. u-stitch and knit off, peg 6 will have 3 wraps, on this peg you knit 2 over 1.
Row 8: Move loop from peg 7 to 6 and from peg 5 to 6; pegs 7 and 5 are empty. Wrap all peg for cont. u-stitch and knit off, peg 6 will have 3 wraps, on this peg you knit 2 over 1.
Repeat these 8 rows.
It is highly recommended that you become familiar with the stitch before making the cowl. The practice piece doesn’t have to be done with the same yarn or loom as the cowl.
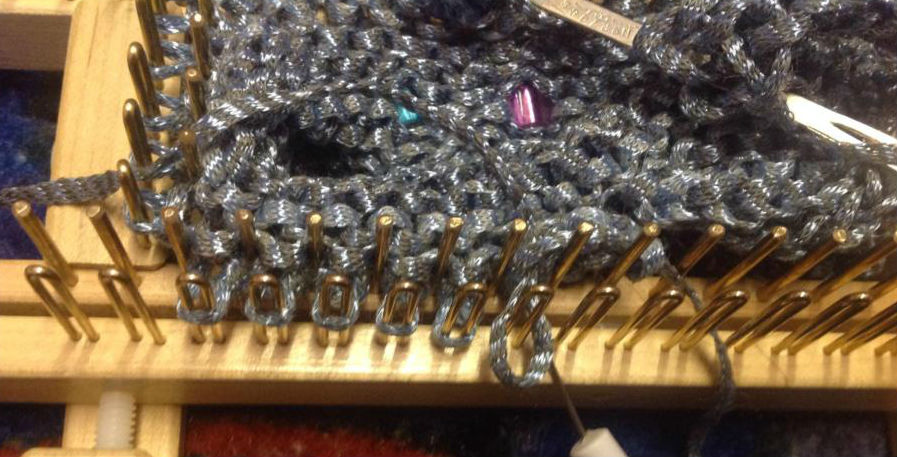
Making the Cowl: The tube will be done on 2 pieces that will be grafted together. If using variegated yarn, you will want to end both pieces with the same shade of the variegated yarn; the length might need to be adjusted for this to happen. Remember the finished dimension is not critical, if you have to add one motive to have the colors match is fine.
Cast on 130 pegs using the long tail cast on.
Work 1 row u-stitch, 1 row of purls and then work Mock Horse Lace, for 24 rows (3 motifs + 1 row) and cut the yarn leaving a long tail.
Attach one of the contrasting yarn and work u-stitch for 3 or 4 rows. Take off the loom, either by binding off, or cut the tail of the yarn, thread the needle and run it through each peg (as a life line) and take off. I find the second way faster.
With the main Yarn, cast on 130 pegs. Work 1 row u-stitch, 1 row of purls and then work Mock Horse Lace for 81 rows (10 motives +1 row).
Cut off the yarn leaving the tail about 4 ½ times the width of the loom. Attach second contrasting yarn and knit 3 or 4 rows of u-stitch, take off the loom.
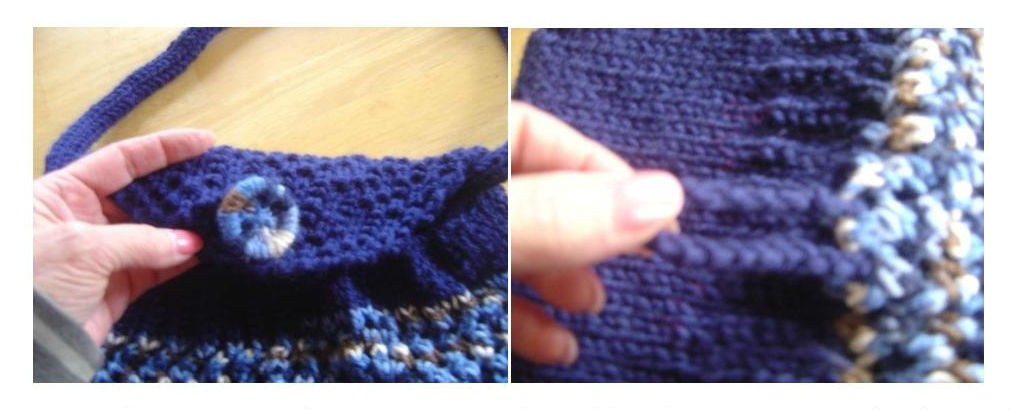
Graft both pieces together; being sure you line up the motifs, the grafting will not be very visible, it will be partially hidden at the neck.
For a free download. Weave in the tails and is done.
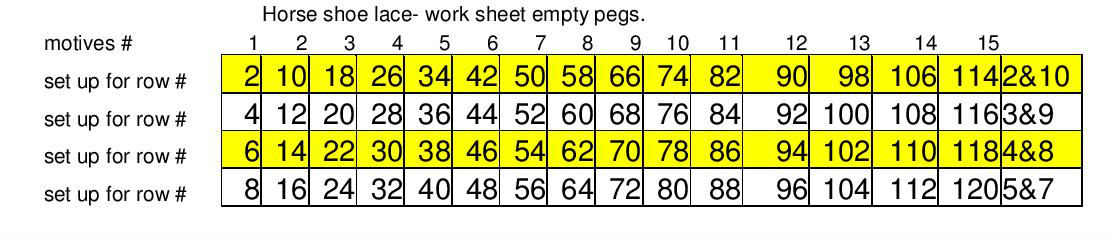
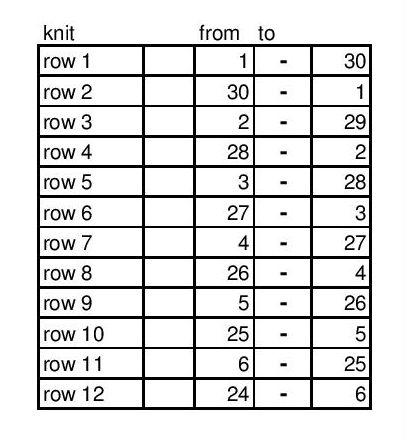
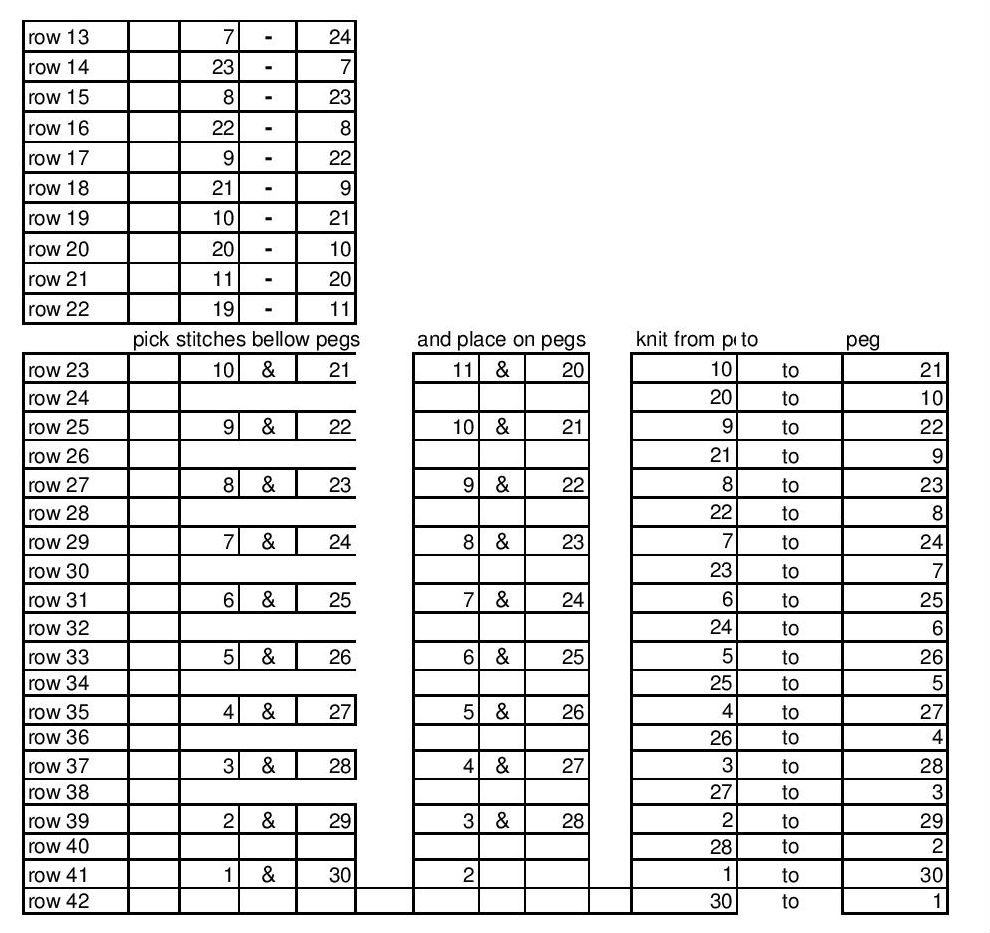
The following chart helps to keep track of what pegs should be empty on each row, you might find it helpful but you do not need to use it. It is done for any project that uses either Mock Horse Shoe Lace or Horse Shoe Lace. It has more rows than needed for this particular project.
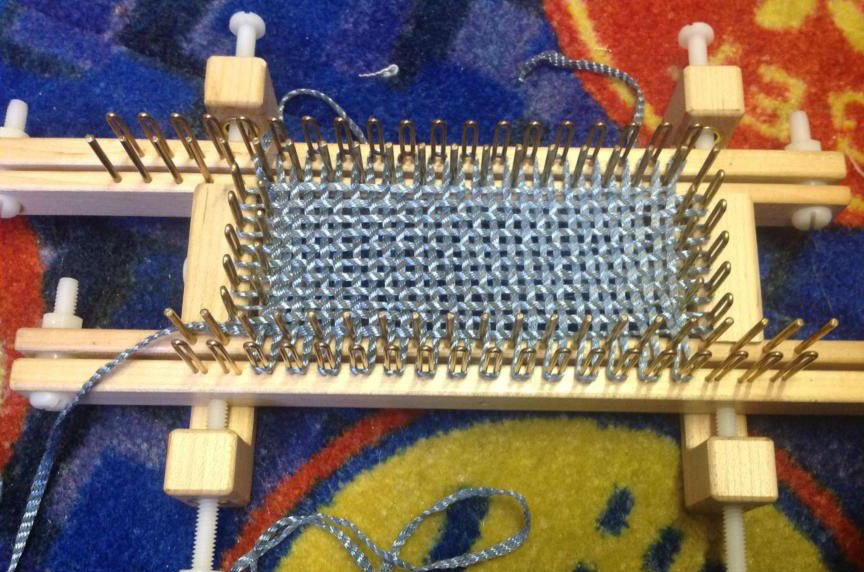
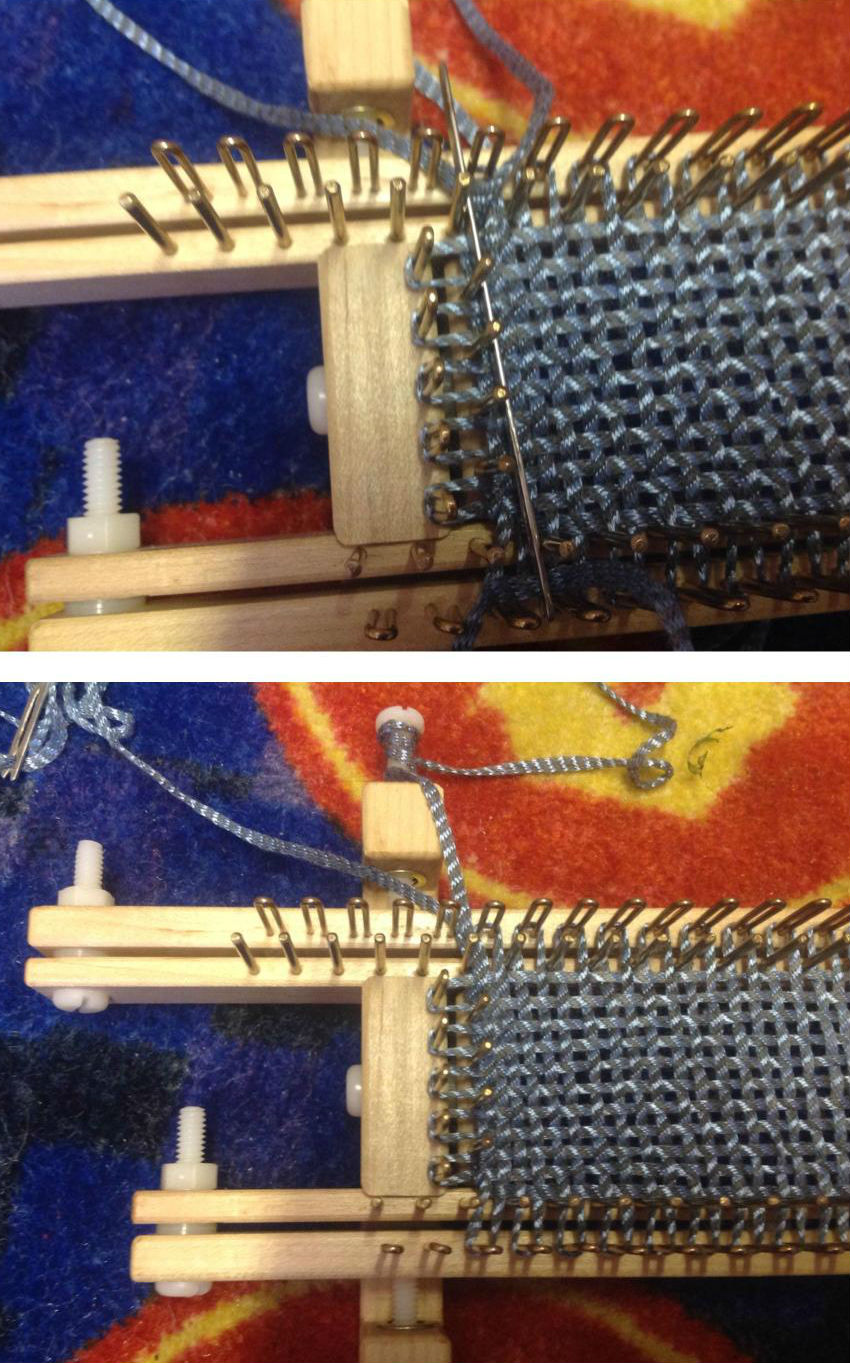
Andalusian Washcloth
Andalusian Washcloth
by Kelly Jones ©2010
This simple knit and purl combination washcloth is a quick knit for those last minute projects.
For more of Kelly's patterns visit: www.kellyknits.com
Supplies: Cotton Yarn – Sugar N Cream used in sample, yarn needle, and loom pick.
Loom: Kiss Regular Peg 2-Way Adjustable Loom
Cast on 20 pegs using double e-wrap cast on.
Row 1-2: Knit using continuous u-wrap
Row 3: K1, P1, K1, P1 repeat to end
Row 4: Knit using continuous u-wrap Repeat these 4 rows for a total of 10 times or 40 rows.
Bind off using super stretchy bind-off
Add crochet border if desired. Cloth lays fairly flat without border.
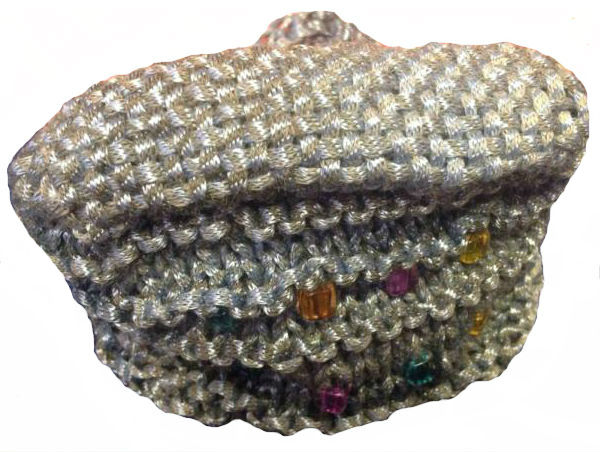
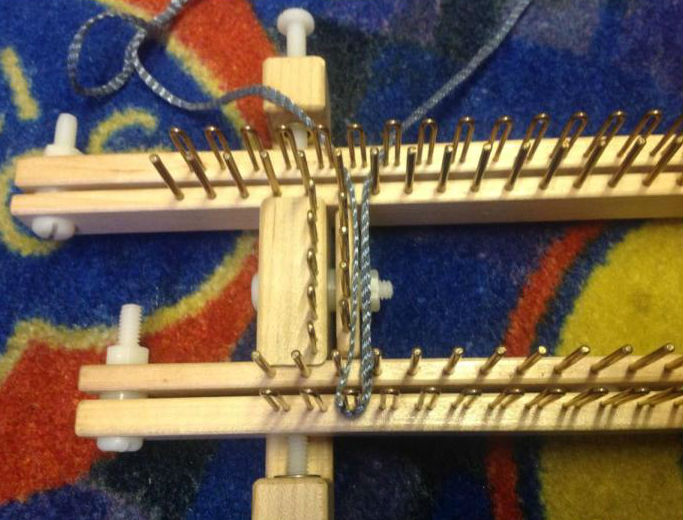
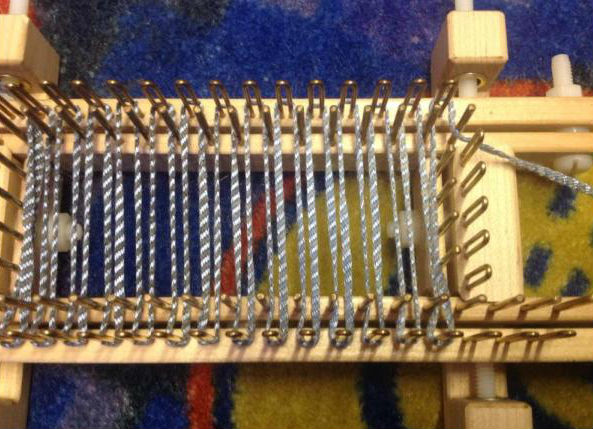
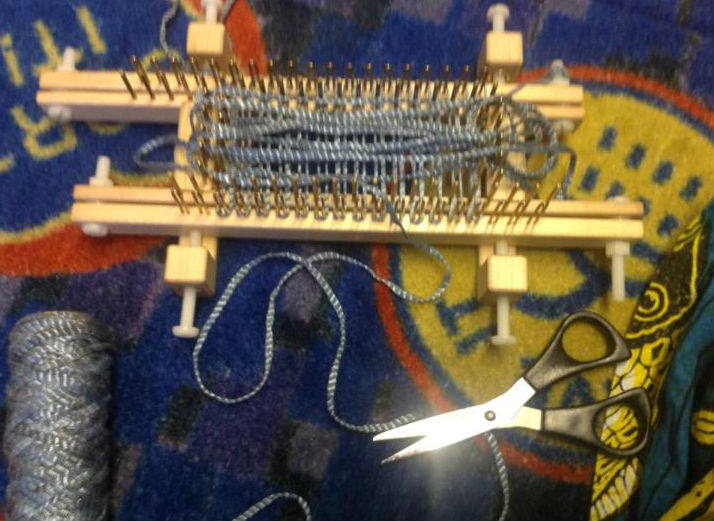
Adult Seamless Hat
Adult Seamless Hat
by Graciela Worth ©2011
Choose your favorite color or even a self striping yarn for this easy knit hat.
For more of Graciela's patterns visit: gracielandcrafts.typepad.com/my_weblog
Giraffe Baby Blanket
Giraffe Baby Blanket
by Kelly Jones ©2010
Knit up this large baby blanket for the newest members of your friends and family. Add more giraffes or panels to change the size.
For more of Kelly's patterns visit: www.kellyknits.com
I really hope you enjoy knitting this up!
Supplies: 41 peg small gauge knitting board (1/4” between pins), 15 washers (1/2”) between boards. Kiss Small Gauge peg boards used.
Note: distance of pegs and board to board gauge will affect the pattern.
Yarn: 1 ¾ skeins (355 yards per skein) of #4 weight I Love This Yarn in Burnt Pumpkin, and 4 skeins (196 yards per skein) of #4 weight Bernat Denim Style in Chino, single stranded. For the giraffe pattern Burnt Pumpkin and 1-2 yards of Yarn Bee Luscious in Lemondrop were used in the sample.
Stitch: Stockinette cast-on and stitch used throughout.
Finished Size: approximately 32” h x 33” w
Squares are knit individually and sewn together using an invisible stitch. 4 squares of Burnt Pumpkin and 5 squares of Chino (one with giraffe pattern).
Solid Squares:
Cast on 41 pegs, count cast on row as first row of pattern. Lay anchor yarn. Knit 53 rows and bind off using one over one crochet method. Bind off starting edge using one over one crochet method.
Giraffe Pattern Square:
Yarn Preparation for Pattern:
Wind 2 yards of Burnt Pumpkin on to a paper towel roll for use with the front legs of the giraffe.
Cast on 41 pegs, count cast on row as first row of pattern. Lay anchor yarn. Knit 8 rows in Chino using stockinette stitch.
Row 9: start with contrast color (Burnt Pumpkin) and place slip knot on peg 12 (top or bottom of board doesn’t matter) wrap pegs 12 and 13 in stockinette stitch, knit off. Using yarn placed on paper towel roll place another Burnt Pumpkin slip knot on peg 23 and work pegs 23 and 24 in stockinette stitch, knit off.
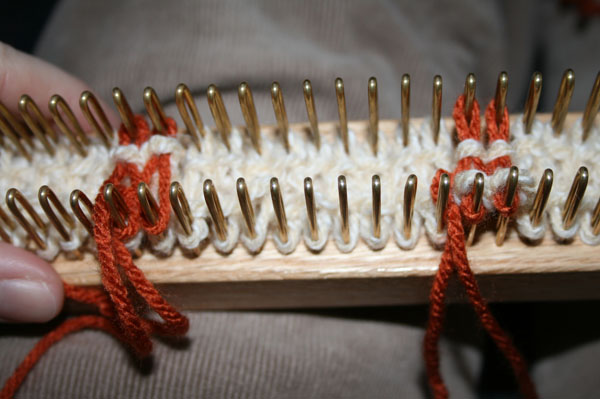
Pick up main color (Chino) and knit remaining unworked pegs (skipping pegs 12, 13, 23, and 24 on this row). You’ll place the main color working yarn across the top of the contrasting color. If you ended with the main color working yarn on the top of peg 11 you'll start peg 14 at the bottom of the board (it’ll form an “x” over the contrasting color - see photo below). Make sure you leave the yarn a little loose in the “x”, or it will pull the design to the middle on the finished project. Knit off.
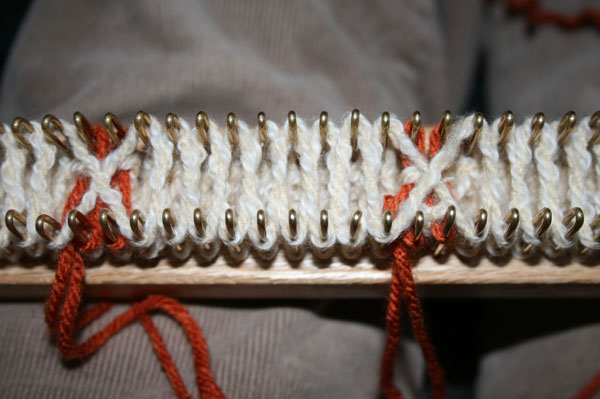
Continue following pattern from chart below. Make sure you start each row with contrast colors and knit those off before going to the main color.
When you finish with a contrasting color cut the yarn leaving a 2”-3” tail and lay it across the center, you can tuck some of it under the “x” from the main color to hold it in place.
When you are done bind off and tuck in all tails! The finished squares were sew together using the invisible mattress stitch http://knitty.com/ISSUEspring04/mattress.html, mid way down the page.
I hope you enjoy knitting this blanket up. Feel free to add more squares to make it larger or move the giraffe pattern square to a different location on the blanket. You could even do all the Chino colored squares with a giraffe pattern. If you knit this up I'd love to see a picture of your finished project! Just email to This email address is being protected from spambots. You need JavaScript enabled to view it.
![]()
Little Bird Potholder
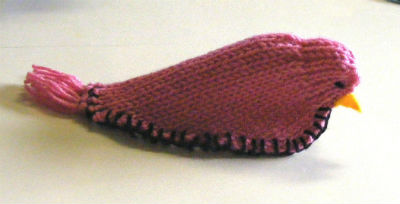
Little Bird Potholder
by Graciela Worth ©August 2011
This little bird takes just 40 yards of yarn, 20 for each piece! A great way to use up extra cotton and a perfect accompaniment to any kitchen decor. Would also make a great kid's washcloth friend for bath time.
For more of Graciela's patterns visit: gracielandcrafts.typepad.com/my_weblog/
Spring Candy Dish
Spring Candy Dish
by Angel Philipp ©2011
A perfect little dish for any occasion! Make it with orange and black yarn for Halloween or red and green for Christmas.
For more of Angel's patterns visit: http://angelphilipp.wordpress.com/
McCoy Mitts
McCoy Mitts
by Robin McCoy ©2008
This is another pattern that was designed especially to celebrate the Kiss Loom’s first birthday.
For more of Robin's patterns visit: rockintheloom.wordpress.com/
Supplies
-Kiss Loom Modular Loom set up with 4 - 6 peg sides on 1st setting + 3 washers
-Less than ½ a skein of Red Heart Super Saver WW yarn in your choice of color (cables show best in light colors)
-Pick tool, cable needle, yarn needle and scissors
Abbreviations
-K (Means to knit, use the continuous u-stitch)
-4st-RC and 4st-LC (4 stitch Right and Left Cross cables)
-P (Means to purl, use the continuous purl stitch)
-RT and LT (Right Twist and Left Twist cables)
Special notes
-It may be helpful to use the tutorial I created for Cables on the Kiss Loom that can be found here: http://www.box.net/shared/un9n0pao8w
-The bind off used in this pattern is done as follows (it is helpful to keep it all fairly loose):
*E-wrap and knit off pegs 1 and 2 *Move loop from peg 2 to peg one and knit off.
*Move loop back to peg 2, which now becomes your new peg 1.
*E-wrap and knit off the next peg, move it to peg 1, knit off, move loop back to it’s original peg.
*Repeat the last step until all pegs have been bound off
Right hand mitt
-Cast onto the entire loom with the double e-wrap method from right to left (clockwise direction).
-Row1: K all
-Row 2: P all
-Row 3: K all
-Row 4: K all
-Row 5: K all
-Row 6: Bind off pegs 1 and 2, K to end
-Row 7: Double e-wrap cast on to pegs 1 and 2, K, 4st-RC, K4, 4st-RC, K to end
-Row 8: K all
-Row 9: K7, 4st-LC, K to end
-Row 10: K all
-Row 11: K3, 4st-RC, K4, 4st-RC, K to end
-Row 12: K all
-Row 13: K7, 4st-LC, K to end
-Row 14: K all
-Row 15: K3, 4st-RC, K4, 4st-RC, K to end
-Row 16: K all
-Row 17: K all
-Row 18: *K2, RT* (repeat from * to * 3 more times), K to end
-Row 19: K all
-Row 20: K4, *LT, K2* (repeat from * to * 2 more times), K to end
-Row 21: K all
-Row 22: *K2, RT* (repeat from * to * 3 more times), K to end
-Rows 23-26: K all
-Bind off using the method described previously and try to keep it loose so that it will slide over your hand comfortably.
-Weave in all loose ends.
Left hand mitt
-Cast onto the entire loom with the double e-wrap method from right to left (clockwise direction).
-Row1: K all
-Row 2: P all
-Row 3: K all
-Row 4: K all
-Row 5: K all
-Row 6: K16, bind off pegs 17 and 18, K to end
-Row 7: K3, 4st-RC, K4, 4st-RC, K, double e-wrap cast on to pegs 17 and 18, K to end
-Row 8: K all
-Row 9: K7, 4st-LC, K to end
-Row 10: K all
-Row 11: K3, 4st-RC, K4, 4st-RC, K to end
-Row 12: K all
-Row 13: K7, 4st-LC, K to end
-Row 14: K all
-Row 15: K3, 4st-RC, K4, 4st-RC, K to end
-Row 16: K all
-Row 17: K all
-Row 18: *K2, RT* (repeat from * to * 3 more times), K to end
-Row 19: K all
-Row 20: K4, *LT, K2* (repeat from * to * 2 more times), K to end
-Row 21: K all
-Row 22: *K2, RT* (repeat from * to * 3 more times), K to end
-Rows 23-26: K all -Bind off using the method described previously and try to keep it loose so that it will slide over your hand comfortably.
-Weave in all loose ends.
Jenny's Boy Blanket
Jenny's Boy Blanket
by Kelly Jones ©2014
This blanket was made using bulky weight yarn on a small gauge slim loom. The design includes some intarsia techniques at the color changes.
Loom – Regular Gauge 2 Way Adjustable with 40 pegs and 21 peg end pairs with 8 washers
Supplies: pick, tapestry needle
Yarn: Lion Brand Hometown USA super bulky 100% acrylic, San Diego Navy (2), Oklahoma City Green (1) , Los Angeles Tan (1)
Finished Size: 22” w x 29” h
Gauge: 10 sts x 15.5 rows over 4”
This pattern can be made in any yarn or any gauge. For smaller gauges increase the number of stitches and rows used.
Cast on 50 stitches in green. Follow the pattern below for the color changes.
The main line of tan running down each side of the green center stripe is from pegs 22-25, 26 and 27 are the green stripe then 28-31 for the other tan stripe.
At the color changes make sure you twist the yarn at the back of the pins so that there are no holes formed. Always twist the yarn so that the yarn on top is going in the direction you are knitting.
![]()
Bind off using a basic bind off. When doing the bind off, the color will shift to the left, so you will need to switch to the next color one stitch early.
![]()
![]()
Kiss Looms is home to the 2-Way Adjustable Gauge Loom! Our looms were designed with the Kiss principal in mind. Keep it simple! Our looms allow you to change your gauge for any project, while still using the same loom. Knit with sock weight yarn using our fixed gauge looms or get an adjustable loom to knit from sport weight to super bulky!
Any questions? Not sure what loom to get? We love helping you with suggestions.Feel free to email us at: orders@kiss-looms.com